How to Make a Book Cover on Canva (Step-by-Step Guide with Pictures)
Last updated on August 16th, 2025 at 09:50 am
Welcome! I’m Subha and today I will teach you how to make a book cover on Canva for Free without being a master in graphic design.
When it comes to creating covers for your books, Canva is my go-to resource as it is easy to use and provides me with a lot of free graphics, photos, shapes & icons.
I have been using Canva for the last five or more years not only for book cover design but also YouTube thumbnails, blog images, logos, and much more. It’s just a wonderful design tool to create covers for both ebooks and print books.
Why To Use Canva For Book Cover Design?
First of all, Canva is a web-based design app and you can access it from any device having an internet connection. Secondly, Canva comes with a Free version too, which is more than enough for creating book covers for Amazon Kindle and other print-on-demand platform.
Thirdly, Canva has a very user-friendly interface and a very short learning curve. It also gives you access to premade book cover layouts that you can customize to create your own ebook and print book cover.
Last, but not least, this design tool gives you access to free graphics, icons, shapes, backgrounds, and a lot of other images you need to create any design including book covers.
If you subscribe to Canva Pro then you will have access to a lot of premium images, graphics, elements, and templates. However, many self-published authors use the free version of Canva to create beautiful cover images to increase book sales.
Canva’s book cover tool allows you to create covers for Kindle ebooks very quickly and easily. In this blog post, you are going to put together a cover for a paperback book.
👉 I have also reviewed 5 Best KDP Courses to start and scale low content and medium content publishing business, you can read the blog post here.
How To Make A Book Cover On Canva Step By Step
🎁 Download 15 FREE KDP Interior Templates
Save time and create beautiful low-content books faster with these 15 ready-to-use KDP interiors — completely free! Perfect for journals, planners, and activity books.
Below I will teach you the step-by-step process to create a book cover on Canva. So don’t skip and read it til the very end.
Create an Account On Canva
Go to Canva.com and create an account using your email and password. You can also sign using your Facebook or Gmail account, this won’t require you to set a password.
Things You Need to Create a Paperback Book Cover Using Canva
First of all, you need a book cover template to create a full wrap paperback cover with Canva. You will also need the right cover dimensions for your book cover. You can get this information easily from the Amazon KDP book cover calculator.
Visit https://kdp.amazon.com/cover-calculator and Input your book details as shown in the screenshot below;
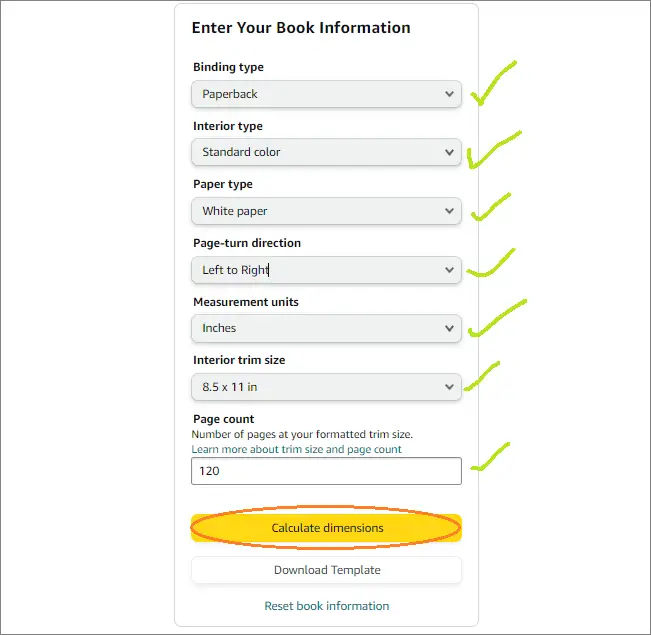
Next, click on the Calculate dimensions, and from there download your book cover template. You will also see the size of your book’s cover there.
Create a Blank Cover Design Template On Canva
Log in to your canva account and from the home page click on Create a New Design;
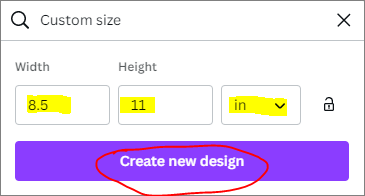
Here enter your book dimensions and click on create a new design again. This will take you to a blank Canvas where you can import your kdp cover template for creating a full cover.
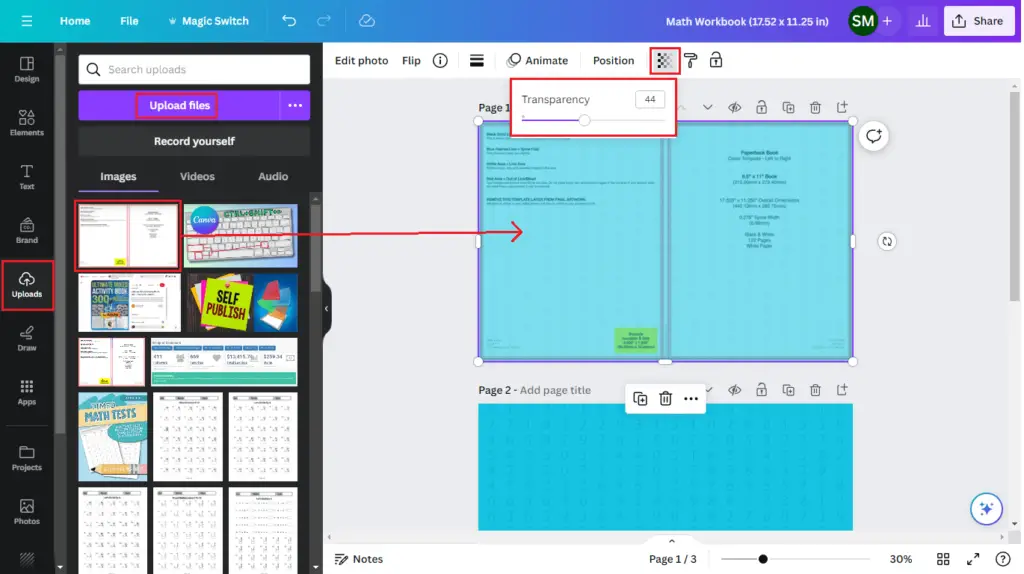
You can enlarge the template to fit the canvas size. Now you can add design elements on top of the template.
Adding Background Image To Your Book Cover
This is the very first thing you will need while creating your first book cover in Canva. Here, you can either select a solid color as a background or add an image background from the Elements tab.
I first selected a solid background color and then searched for a mathematic background image in the Design tab. I clicked on one of them to add it to my cover template.
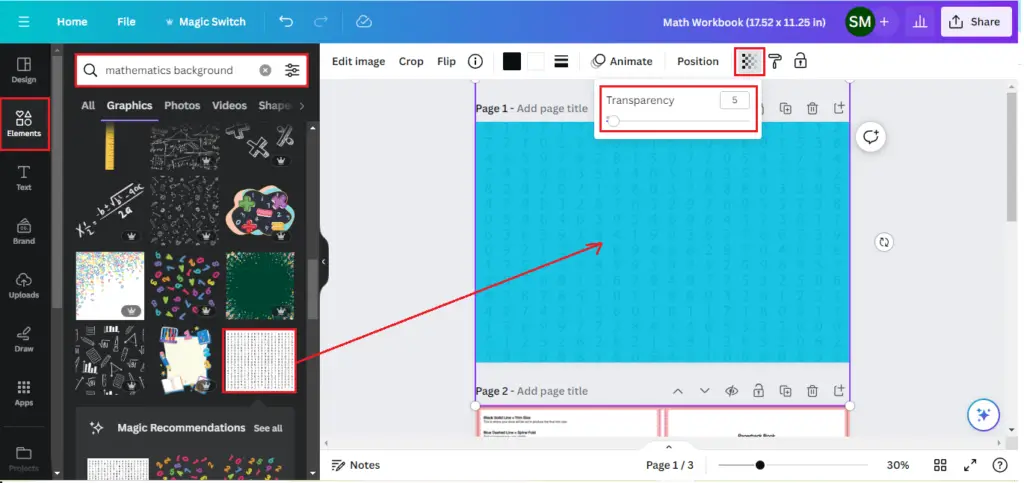
You can see I have decreased the opacity of this image to 5% so that it gives a math look to the image. Next, you can drag and drop your book cover template on Canvas to start creating the front and back cover.
You can drop the opacity of the kdp template so that you can see the background image as well. Here first you can design the Front Cover and then the Back Cover.
👉 Want to create kdp low content books fast? I have shared a step-by-step process of creating and publishing a kdp journal in under 60 minutes, you can read it here.
Adding Text & Elements To Your Cover Image
Now you can start adding your book title, subtitle, author name, and other info on your front cover. You can also upload and add your own images like I did to create a math workbook cover. Additionally, you can also grab free images from Pixabay or Pexels.
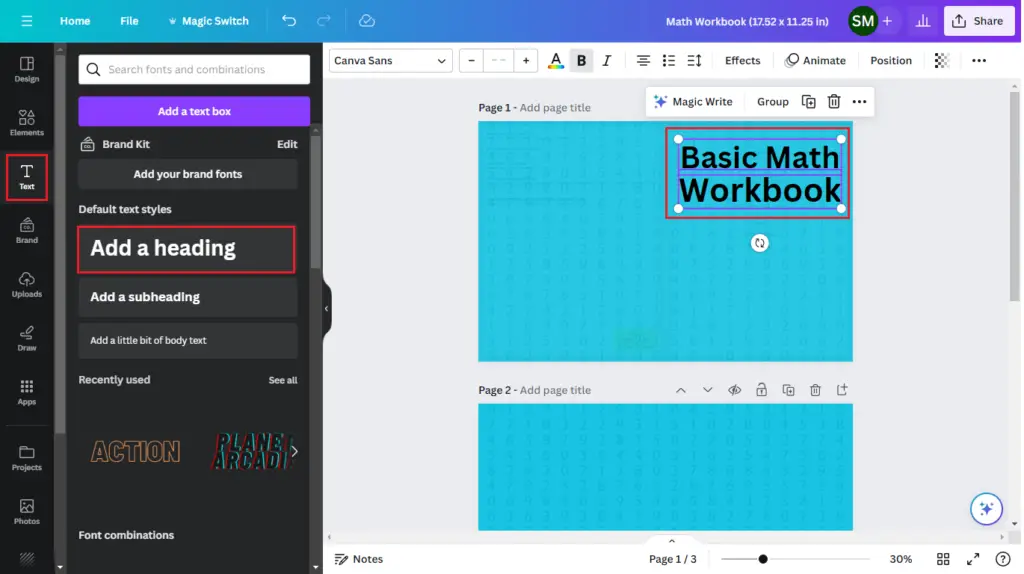
As you can see I have added my book title as Basic Math Workbook. To that you can go to the Text tool and then click on the Add a Heading, this will add a custom text on your book cover. Replace the text with your book title and move it place in on the cover.
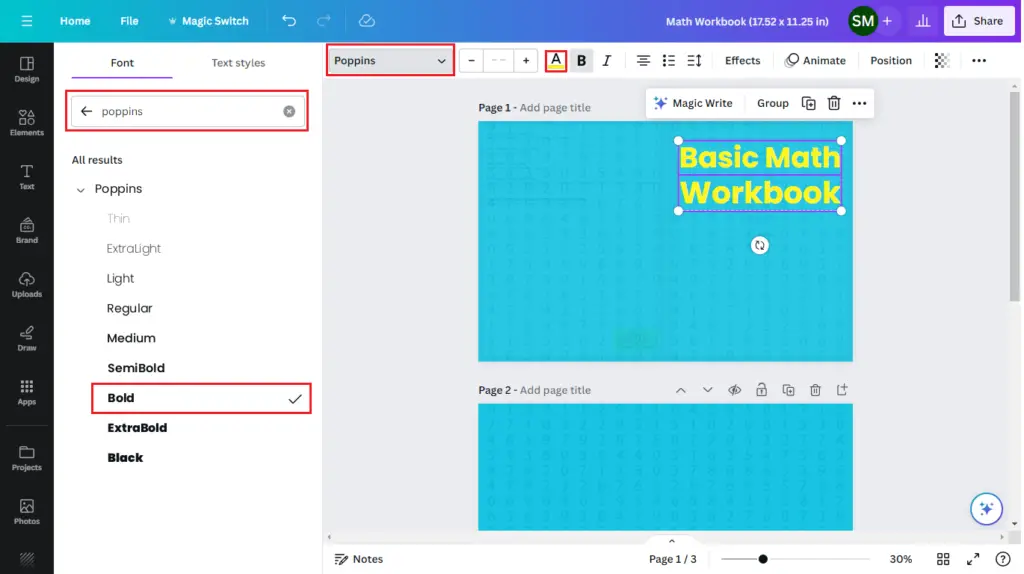
Next, you can change the font, font color, and font size to make your book title big and eye-catching. I changed the color of my book title to Yellow, the Font to Poppins Bold, and the Font size to 95 points.
Adding Text Effects & Image Effects
You can add text effects to make your book title pop. Just select your book title, click on the Effects tab, and then click on the Outline effect. Here you can change the outline color to black as our color is yellow.
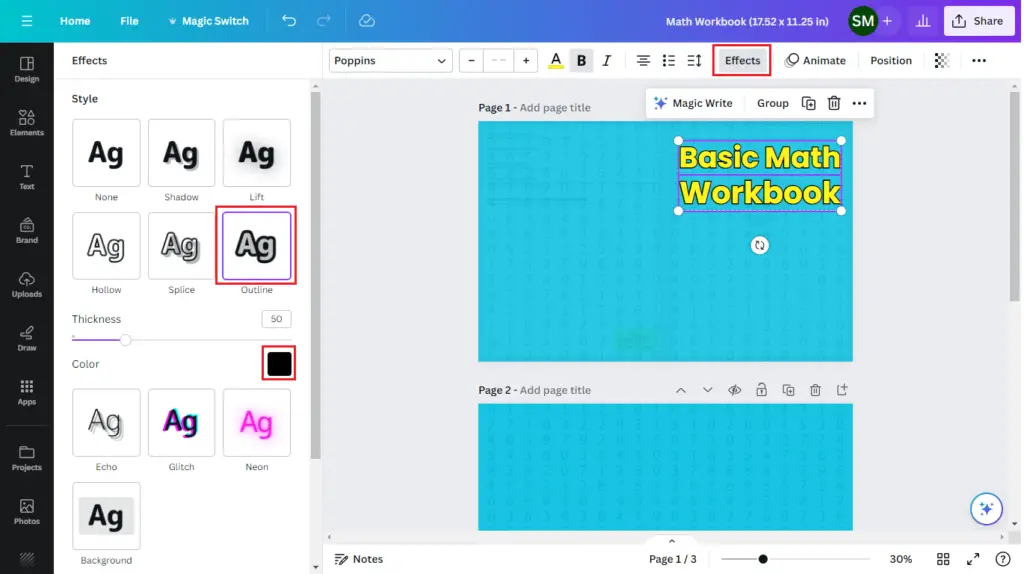
Look at the difference yourself. The book cover looks more prominent and eye-catching. Next, you can add some math elements, I will upload my own math worksheets that I created using the math worksheets generator.
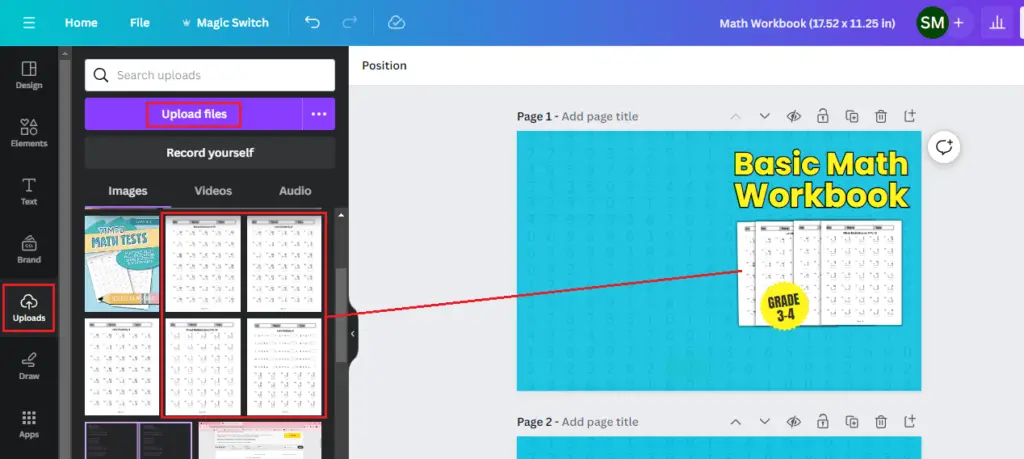
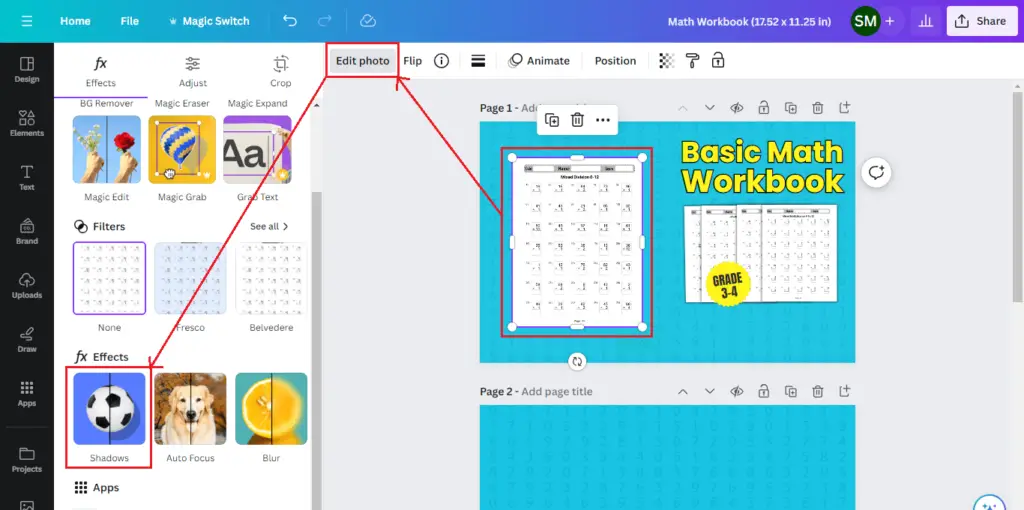
I added 4 math worksheets on the front cover and resized them to fit on the front cover and look nice. I also added image effects to these images. You can do the same, just click on any image then click on the Edit photo option, and then click on Shadows app.
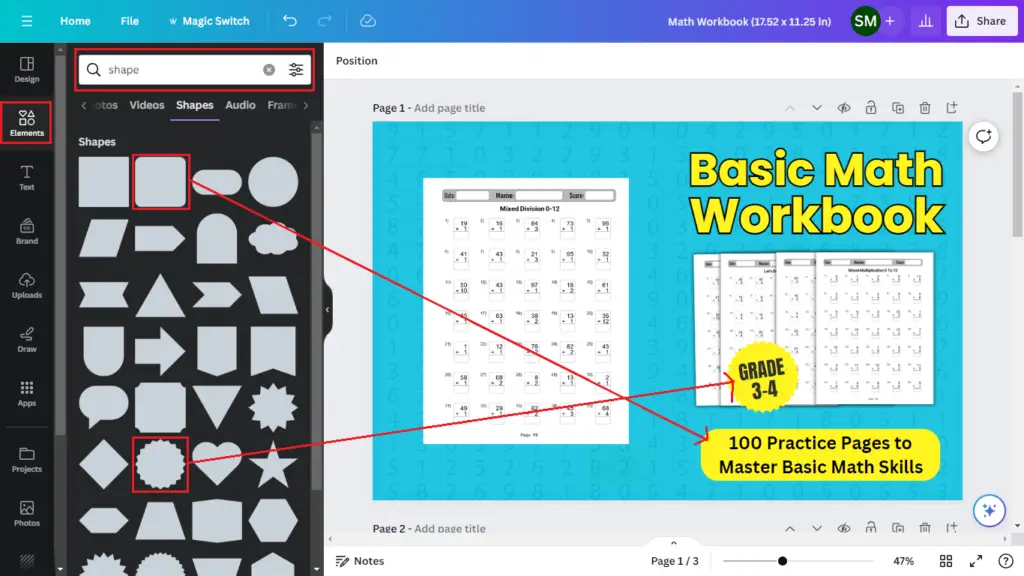
As you can see, our kdp book cover has started to look a bit nicer. Here you can add a sub-title and grade info like I added a star shape and then wrote grade 3-4. Then added another shape and wrote my book title over it.
✨I have written a detailed post about Titans Pro, a brand-new kdp tool that makes finding kdp niches and keywords fast and easy. You can read the blog post here.
Giving Final Touches to Your KDP Book Cover
You’ll need to add some elements/images to your back cover and then increase the opacity of your kdp cover template to make sure all the cover elements are within the margins and well-aligned.
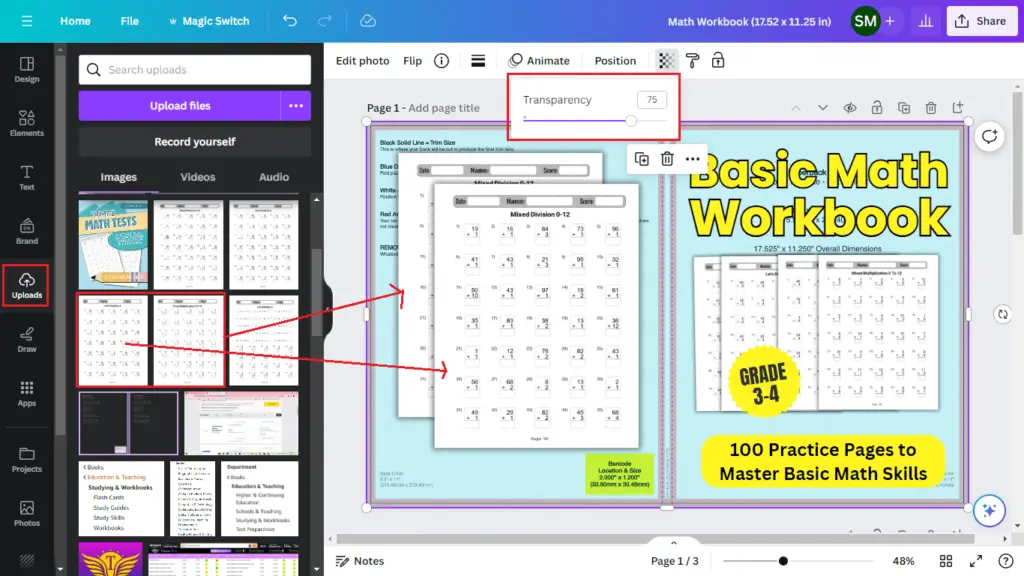
Once you are satisfied with the placement of your elements both on the front and the back cover, you can go ahead and delete the book cover template. Just click on it and hit delete from the top menu.
Now you can preview your book cover to make sure there are no grammar and spelling errors. Then you can move ahead and download your first paperback book cover.
Downloading Your Book Cover From Canva
To download your book cover you can go to the share button from the top right side. Next, click on the Download button then change the file type from PNG to PDF Print, select the page as Current page, and click on the Download button.
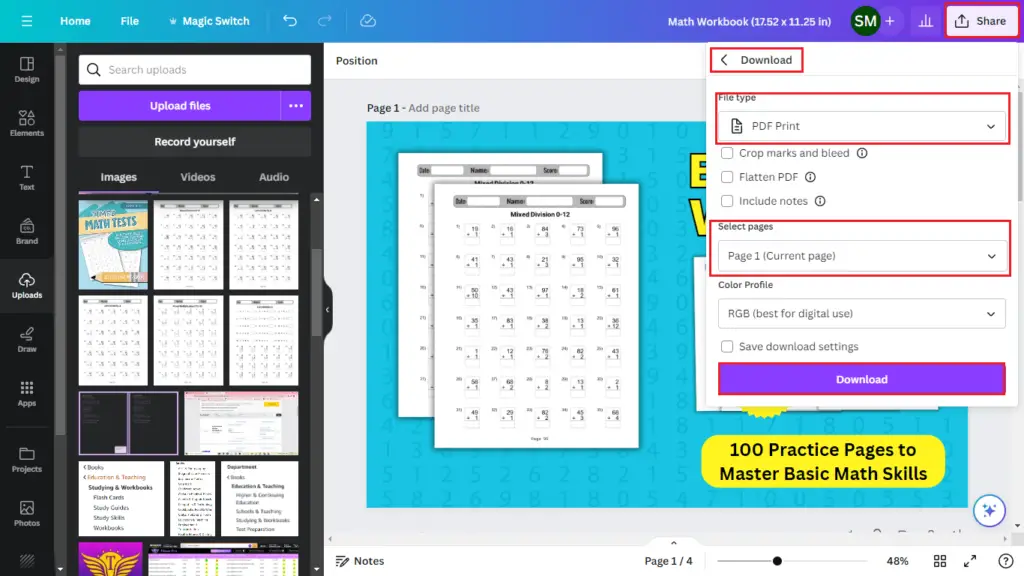
Congratulations, you have just made a book cover with Canva. Now you can go ahead and start uploading your book on Amazon Kindle.
Tips For Making A Book Cover In Canva
Below are some tips for creating great book covers that appeal to your target audience. Book cover is the first thing your customer looks at and decides whether to click on it or not. Therefore, you need to consider a few things to create eye-catching book covers.
Use High-Quality Images And Fonts
Using high-quality images and fonts is crucial for creating a book cover that is both eye-catching and professional. When it comes to using images, it is important to select ones that are relevant to the book’s topic and that will appeal to the target audience.
Secondly, you should choose your fonts carefully, as they can set the tone for the entire book. By using high-quality images and fonts, you can create a book cover that will help your book stand out from the competition.
Keep Your Design Simple And Easy To Read
When making a book cover in Canva or any design software, it is important to keep your design simple and easy to read. This means using clear and bold fonts, avoiding too much text, and using images that are relevant to the book’s topic.
You should also make sure that your design is visually appealing and stands out from the competition. By following these tips, you can create a book cover that will help your book sell.
Use Eye-Catching Colors for Your Book Covers
Eye-catching colors can help your book stand out in the sea of books and grab your customers’ attention. When choosing colors for your book cover, keep in mind the following things:
- The target audience for your book. If you’re writing for a younger audience, you might want to use brighter colors than if you’re writing for adults.
- Use Complementary Colors: Complementary colors are colors that are opposite each other on the color wheel. When used together, they create a vibrant and eye-catching effect. Some examples of complementary colors are red and green, blue and orange, and yellow and purple.
- The mood you want to create. Do you want your book cover to make readers feel excited, calm, or something in between?
Once you’ve considered these factors, you can start experimenting with different color combinations. There are no hard and fast rules, so feel free to be creative. Just remember that the goal is to create a cover that is both eye-catching and effective in conveying the tone and genre of your book.
By following these tips, you can create a book cover that is both eye-catching and effective in selling your book.
Get feedback from others before you finalize your Cover Design
It is important to get feedback on your book cover before finalizing it because it can help you identify potential problems, get a sense of how the cover will be perceived, and make sure that the cover accurately reflects the content of your book.
You can get feedback from friends, family, colleagues, social media followers, book clubs, online forums, or professional book cover designers.
✨ Want to create kdp coloring books super fast? Check out the Coloring Book Maker Tool, which gives you access to over 9,250 hand-drawn coloring elements!
Final Thoughts On How To Make A Book Cover On Canva
In this blog post, I showed you the step-by-step process to make a book cover on Canva for free. In conclusion, Canva is a powerful and user-friendly tool for creating book covers, and I hope this step-by-step guide has been a helpful resource for you.
Whether you’re a self-published author, a content creator, or someone looking to design their own book cover, Canva offers a free and accessible platform to bring your creative visions to life.
With its easy-to-use interface, pre-made templates, and a vast library of free graphics and images, you have the tools at your fingertips to design a captivating book cover that will catch the eyes of your readers.
Remember the importance of using high-quality images and fonts, keeping your design simple and easy to read, and choosing eye-catching colors that match your target audience and the mood of your book.
Don’t forget to seek feedback from others to fine-tune your book cover and ensure it effectively conveys the essence of your work.
By following these guidelines and using Canva, you’re well on your way to creating a book cover that will not only reflect your content but also entice potential readers. Happy designing, and best of luck with your book!
Want to Publish Your First Amazon KDP Book the Right Way?
I created a beginner-friendly Amazon KDP course that walks you through niche research, book creation, and publishing — step by step.
👉 Access the Amazon KDP MasterclassPerfect for beginners starting with low- and medium-content books.

