How to Self Publish a Book on Amazon: A Comprehensive Guide
Last updated on December 3rd, 2024 at 05:42 am
Welcome to my blog! I’m Subha and today I will show you how to self publish a book on Amazon. I have been self-publishing ebooks and paperback books since early 2017 on Amazon via their platform known as Kindle Direct Publishing.
In my experience, amazon provides a very good opportunity for authors and self-publishers to reach a wide range of readers and customers worldwide.
And the crazy thing is, publishing a book via Amazon is totally FREE!! You can start with just your laptop and an internet connection. That’s all you need to be a self-publisher on Amazon!
So, without further ado, let’s just dive in…
Understanding the Basics of Self-Publishing

Before moving forward with the process of self-publishing a book on Amazon KDP, let’s just have a look at the basics.
Imagine you have this amazing story or an idea for a planner that you believe the world should see. Self-publishing allows you to do just that without the traditional publishing hoops and hurdles.
So, What Exactly is Self-Publishing?
You can think of self-publishing as taking the reins of your book, from start to finish. You become the writer, editor, designer, and publisher all at once. It’s like being the captain of your literary ship!
Why to Self Publish on Amazon?
Amazon is the biggest online marketplace in the world with a huge buyer base. Most importantly amazon is really popular in first-tier countries like the USA, UK, and Canada. So, by publishing your book on Amazon, you will be putting this in front of active buyers.
The biggest advantage of self-publishing books via Amazon is you don’t need to print books yourself or ship them to the customers, Amazon does it all for you! Amazon uses a Print On Demand service, which prints your book only after a customer has ordered a copy of it.
Amazon also supports other versions of your book like hardcover books and ebooks making your book reach a much bigger audience.
Why is Self-Publishing Awesome?
You get to be in charge! You decide what your book will be about. It could be a fun story, a helpful guide, or even a journal. You also decide when to publish and how much your book will cost.
And when people buy your book, you get most of the money, not some big company. So, you can make your story real and earn from it.
👉 I have also reviewed 5 Best KDP Courses to start and scale low content and medium content publishing business, you can read the blog post here.
My 3-Step Process to Self Publish a Book on Amazon
Below, I will walk you through the step-by-step process of creating and publishing your very first book on Amazon. So, keep reading this til the very end…
Step 1: Preparing Your Manuscript
In this section, you will learn about;
- Formatting guidelines for your manuscript to meet Amazon’s requirements.
- Choosing the right file format (e.g., MOBI, EPUB) for Amazon KDP.
- Tips for editing, proofreading, and polishing your manuscript.
Choosing the Right Software
To create your book manuscript, you can use Microsoft Office or Google Docs. These both are very similar with the only exception that Google Docs allows you to access your manuscript from any computer online.
In this blog post, I will be using MS Word to format the book. You can use any publishing software all you need to know is the Basics.
Selecting the Trim Size & Margins
Amazon kdp allows you to choose from a range of trim sizes including the most popular ones i.e. 8.5” x 11” and 6” x 9”.
The most widely used trim size for paperback books in the United States is 6” x 9”. So, I will be using the 6 x 9 inch trim size for the sack of this blog post.
When it comes to page margins, kdp requires you to have the following margin settings;
| Page Count | Inside Margins (Gutter) | Outside Margins (No Bleed) | Outside Margins (With Bleed) |
| 24 to 150 pages | 0.375 in | 0.25 in (at least) | 0.375 in (at least) |
| 151 to 300 pages | 0.5 in | 0.25 in (at least) | 0.375 in (at least) |
| 301 to 500 pages | 0.625 in | 0.25 in (at least) | 0.375 in (at least) |
| 501 to 700 pages | 0.75 in | 0.25 in (at least) | 0.375 in (at least) |
| 701 to 828 pages | 0.875 in | 0.25 in (at least) | 0.375 in (at least) |
Here the bleed is a printing term and it applies when your images are graphics are extending beyond the above mentioned margins. In such a case the trim size of your book would be slightly different.
Your book trim size without bleed: 6” x 9”
Your book trim size with bleed: 6.125” x 9.25”
Step 2: Formatting Your KDP Book in MS Word
Below you learn to format your kdp paperback book in MS Word. For the sake of demonstration, I am using the 6 x 9 in as the trim size. You can follow along by using the same trim size or you can use your own, it’s totally up to you!
Creating a New Document in MS Word
Just open your MS Word program and from the left menu click on the New tab and then click on Black document;
..........
My Recommended KDP Masterclass 2025
KDP Masterclass By Self Publishing Titans: Get 40% Off For Next 4 Days!
..........
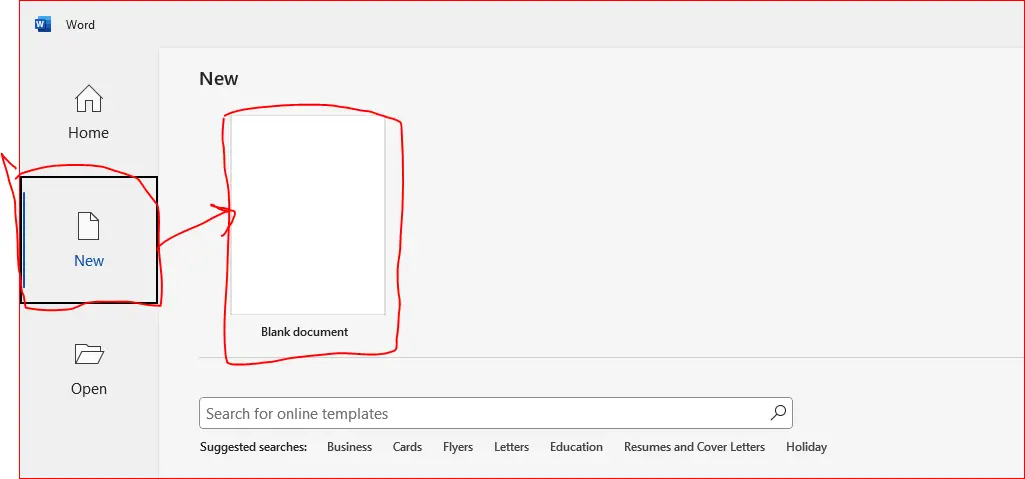
This will create a blank document, you can start your book here but first, you need to change the page layout and margins. Let’s do that…
Page Layout & Margins
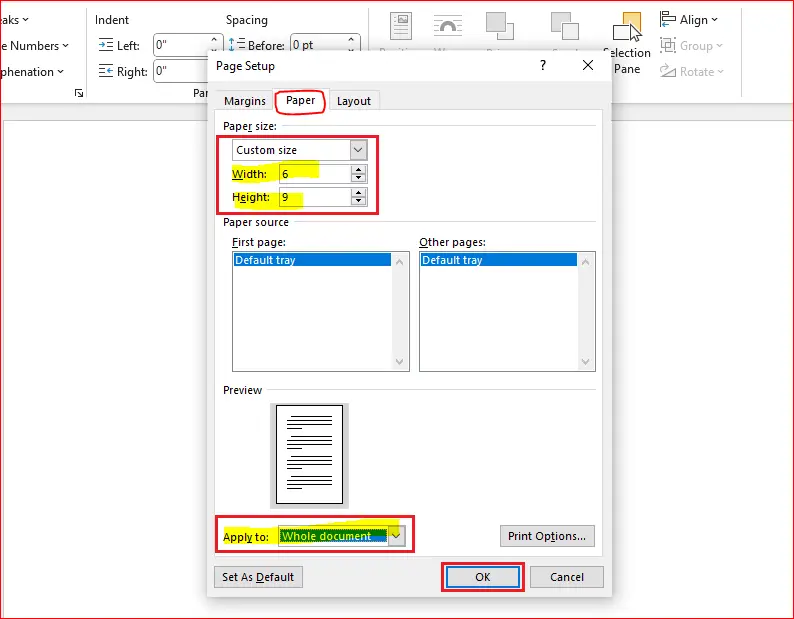
To change the page layout and margins you can go to the Layout tab from the top menu. Next from the sub-menu click on Size and then from the drop-down menu click on More Page Sizes, have a look at the screenshot below.
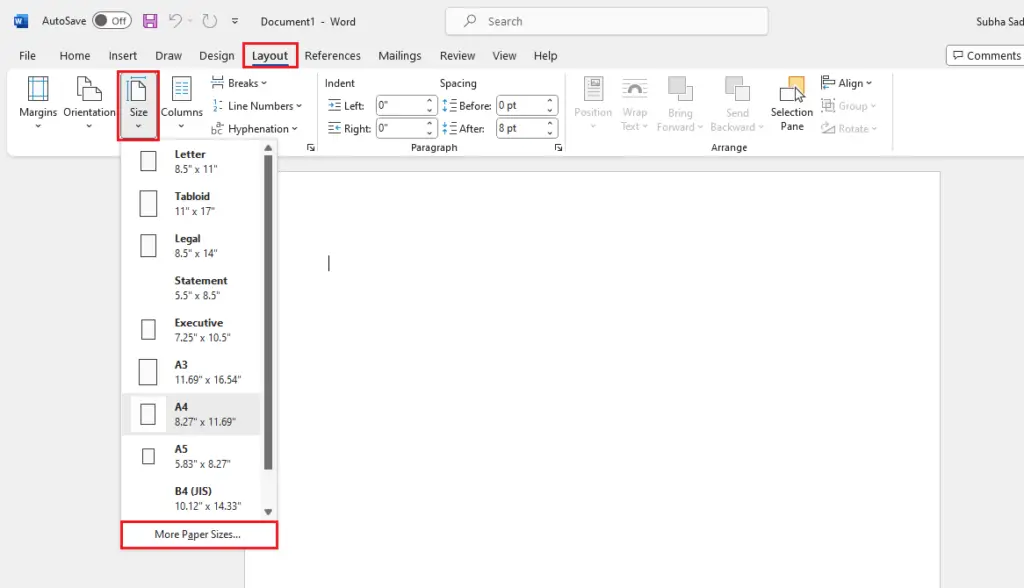
When you click on the More Page Sizes option this will open a new popup window where you can change the page size and set page margins. I went ahead and changed the paper size to 6” x 9”.
Using the same popup window you can also change the page margins. Just switch to the margins tab. Here I have changed the margins as follows;
Top Margin: 0.5 in
Bottom Margin: 0.5 in
Inside Margin: 0 in
Outside Margin: 0.5
Gutter: 0.75 in
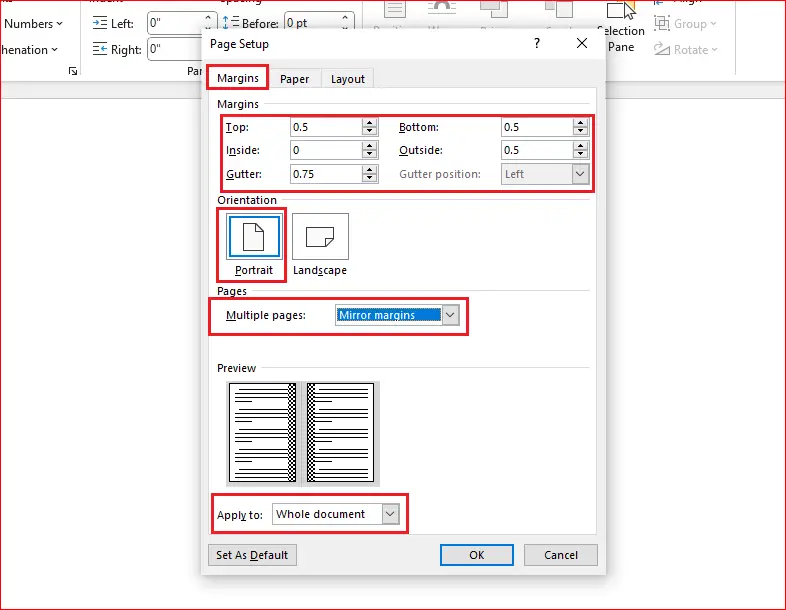
Before changing the margins, I changed the pages settings from Normal to Multiple Pages. After making these changes you can click on the OK button to save them. You can asl save these chagne for future use by clicking on the Save as default.
One thing more, you also need to apply these changes to the whole document, there is an option for that on the same page setup popup window.
Start Writing Your Book in Microsoft Word
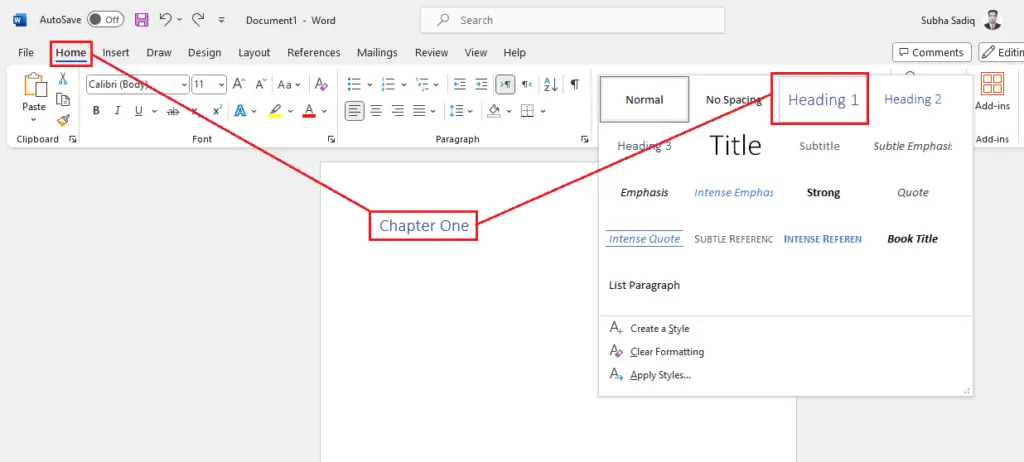
Now you are all set to start writing your first chapter or section of the book. You can change font type and font size by going to the home tab. Also, you set up headings and subheadings (H1, H2 & H3) as shown in the screenshot below.
You will also need to set up page breaks and section breaks. You can easily do this by going to the Layout tab again and clicking on the Breaks option, as shown below.
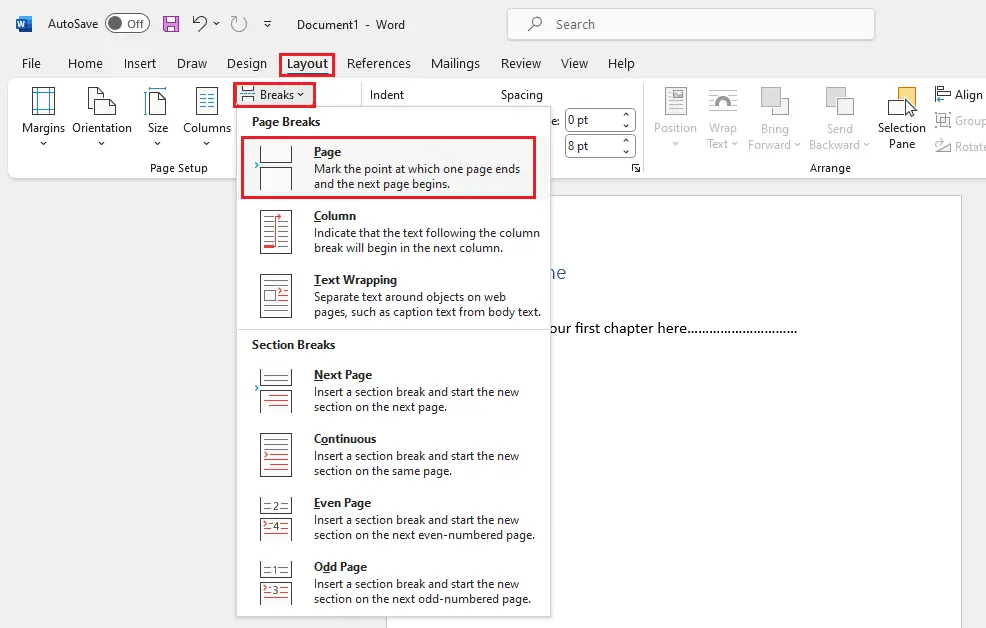
You will also need to add a page break after every chapter to make sure the new chapter starts on the next page.
Adding Page Numbers in Word Document
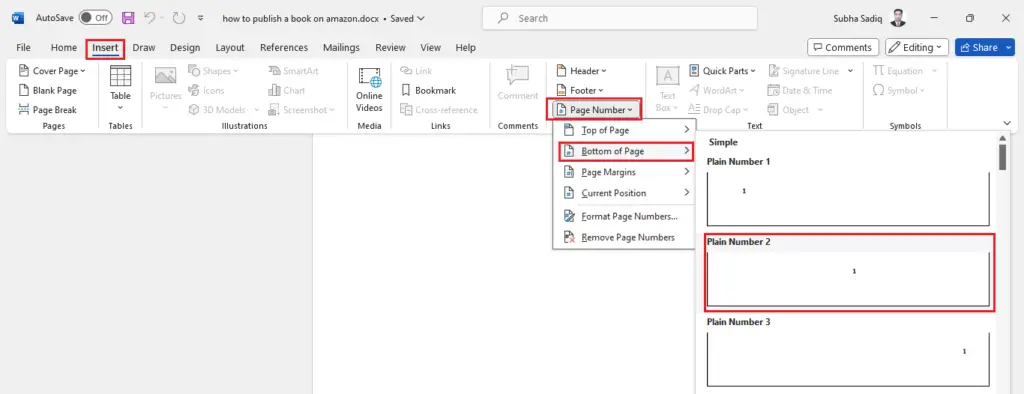
To add page numbers in a Microsoft Word document, you can go to the Insert tab and click on the Page Numbers option. Here you can choose from where you want to show the page numbers. I selected the bottom of the page and opted for the Plain number 2.
Adding Table of Contents
After you have finished writing your book, you can add a table of contents toward the beginning of the book. To do that, you can go to the References tab click on the Table of Contents option, and choose one of the table of contents.
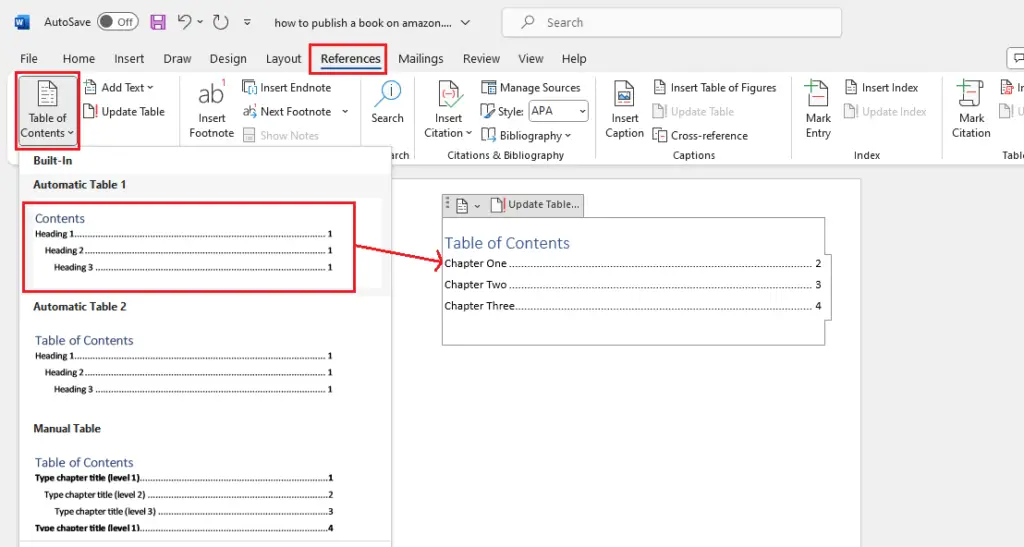
Here you can see, that the table of contents is on a blank page, I added a page break before the first Chapter to add a blank page toward the beginning of the book. Then I added the table contents.
Exporting Your Book Interior
Once you finish writing your kdp book you can save it as a PDF file, this is what kdp recommends for print books.
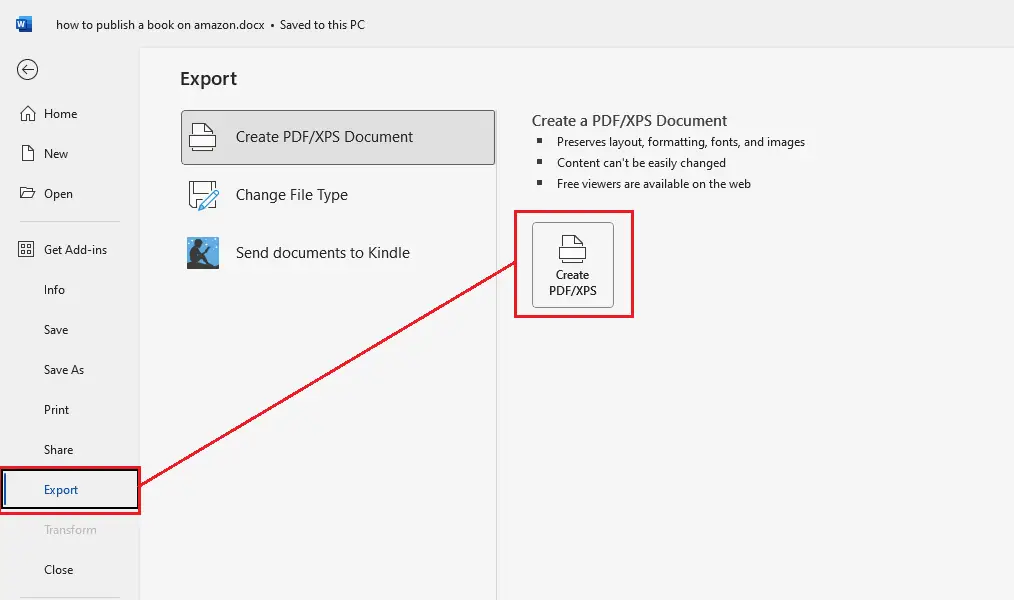
To do that you can go to the File menu from the very top-left, click on the Export button, and then click on the Create PDF/XPS
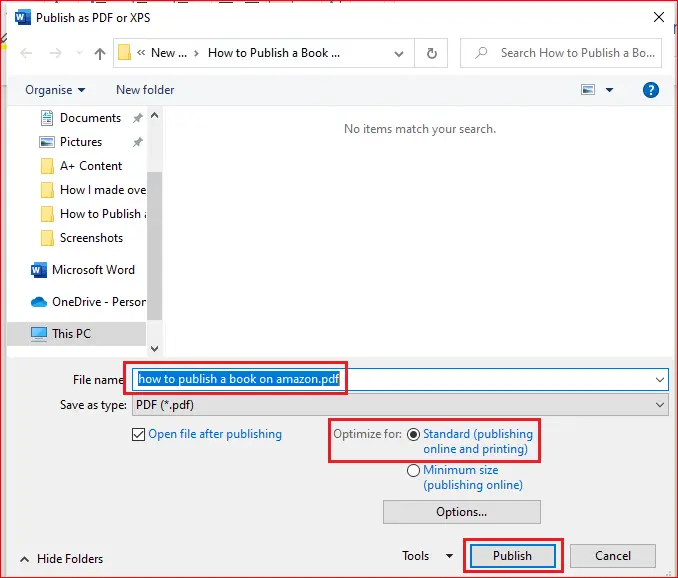
Next, you can give this file and name, choose the print quality, and finally click on the publish button to save your book as a PDF file.
Now your book interior is ready, the next step is to create a book cover.
👉 Want to create kdp low content books fast? I have shared a step-by-step process of creating and publishing a kdp journal in under 60 minutes, you can read it here.
Step 3: Creating a Book Cover in Canva
In this step, I will guide you through the process of creating a book cover in Canva for free. If you don’t know already, canva is a cloud-based tool that allows you to create a wide range of graphics including book covers.
Before creating a cover, you need to have the right dimensions for your book cover. For that purpose, you can download a kdp paperback cover template using the kdp cover calculator.
Just go to https://kdp.amazon.com/cover-calculator and enter your book information to down a cover template. For this specific example, I have the following details;
| Binding type | Paperback |
| Interior type | Black & white |
| Paper type | White paper |
| Page-turn direction | Left to Right |
| Measurement units | Inches |
| Interior trim size | 6 x 9 in |
| Page count | 120 |
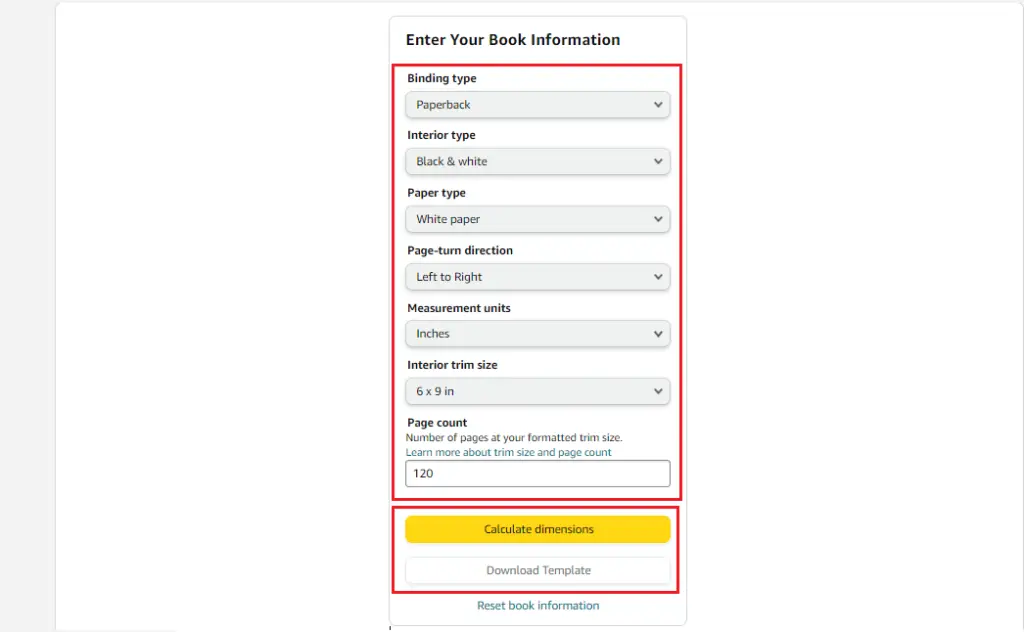
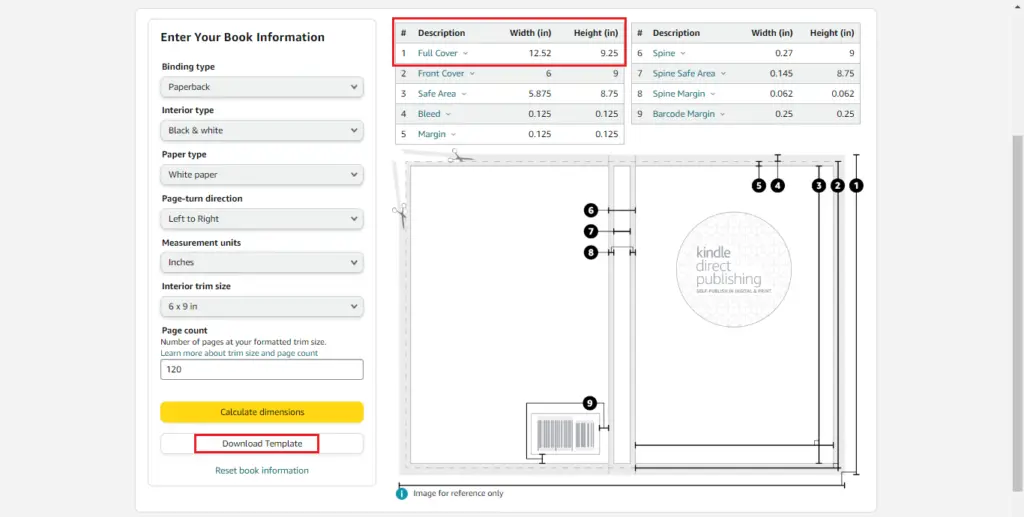
Once, you click on the calculate dimension, kdp generates a book cover template for you and shows you other relevant information. Here you can click on the Download Template, this will allow you to save your cover template on your hard drive.
Once the cover template is saved on your computer, you can extract the zip folder and see the template files. You will see two files one pdf and one png file. In this case, we are more interested in the png file.
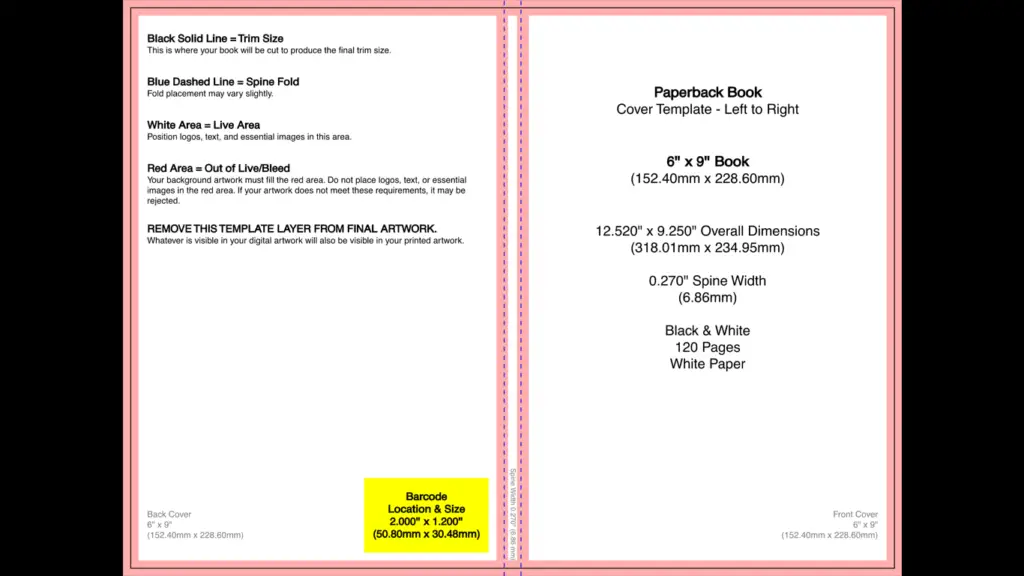
As you can see the full book cover dimensions are 12.52 x 9.25 in. You can use this information to create a book cover in Canva or any other design software.
Creating Book Cover In Canva
You can go to Canva.com and create a free account using your Gmail or Facebook account. Once log in you can click on the Create a Design button, select the custom size, change the measuring units to inches, and finally enter your book cover dimensions.
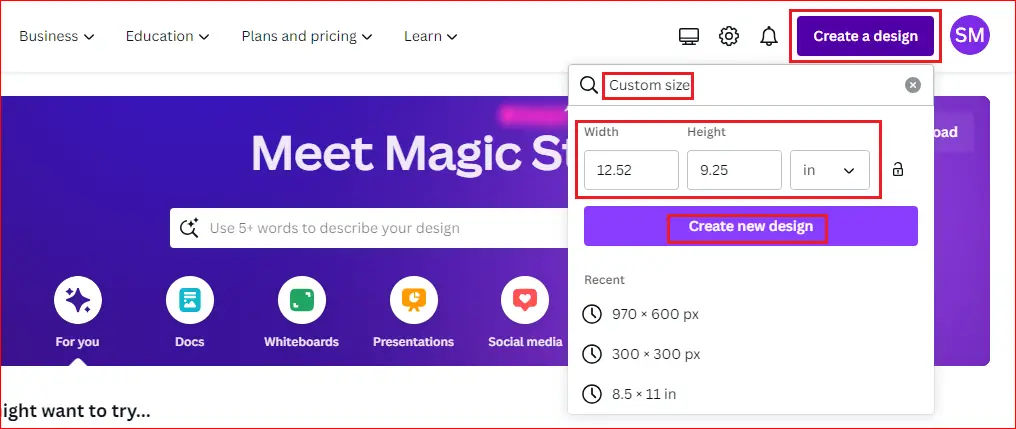
Next, you can click on the Create a new design, canva will take you to the blank canvas having your cover dimension. Here you can upload the previously downloaded book cover template and start creating your book cover.
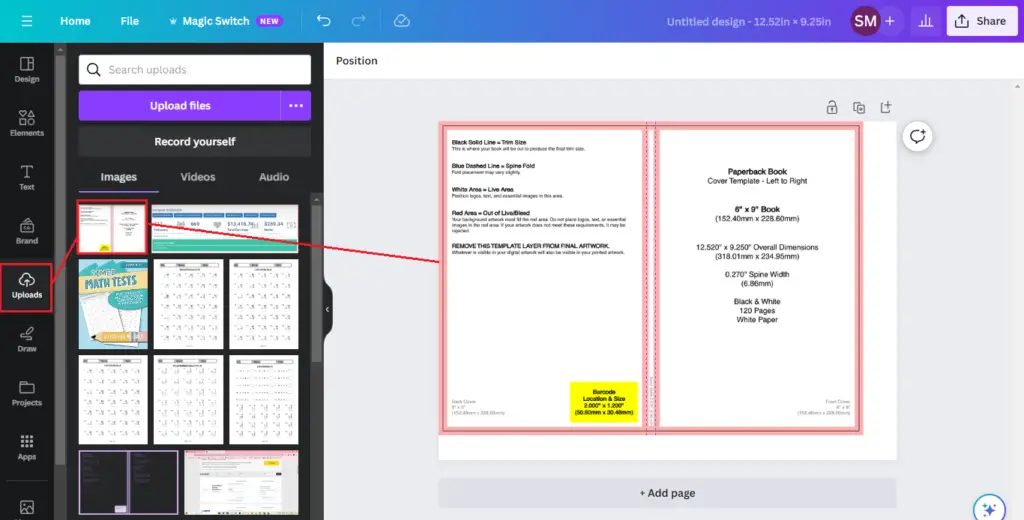
Next, you can click on the uploaded cover template to add it on the canvas to easily create both the front and the back cover. You can use Elements, Text, and images from the left menu to create a beautiful-looking book cover in Canva.
Actually, I have created a detailed video guide on how to create a kdp paperback book cover in Canva, you can watch it here.
Once you are done with creating your book cover, you can download it as a PDF file. Just go to the Share option from the top right corner and click on Download. This will open a new window where you can set the file type as “PDF Print” and click the Download button.
That’s it, you have just created your book cover and you are ready to upload your very first book on amazon kdp.
Step 3: How To Upload a Paperback Book on KDP
This is the third and final step of self publishing a book on amazon kdp. By the time now you have your book interior and book cover ready, so you can move ahead and start uploading it on Amazon via kdp.
How to Create a KDP Account
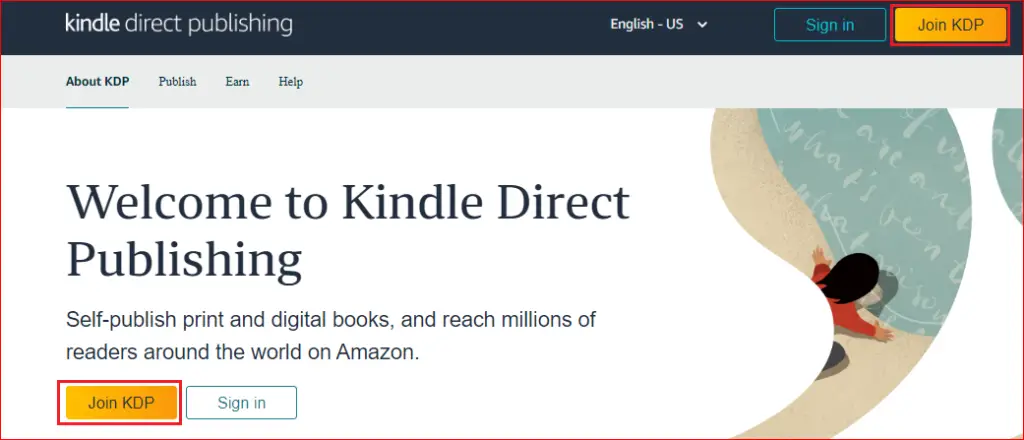
- Visit the Amazon KDP website at kdp.amazon.com
- Click on the “Join KDP.” button
- Follow the prompts to set up your account with your personal and payment information.
- Once your account is ready, you can start publishing your books and managing your author profile.
It’s as simple as that! Your KDP account is your gateway to sharing your stories on Amazon.
How to Upload a Book KDP Account
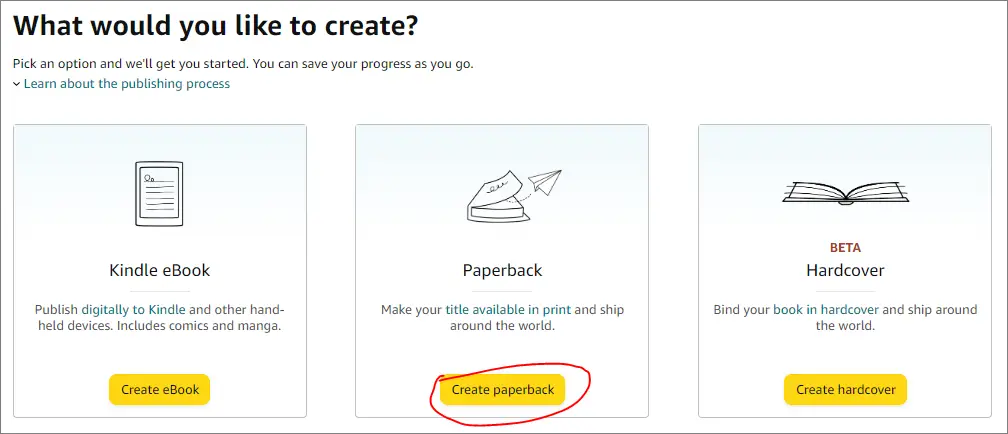
From the kdp dashboard, you can click on the “+ Create” button to start uploading your book.

This will take you to the new page, where you can select the type of book you want to create. For this example, you can click on “Create Paperback”
Step 1: KDP Book Details
On the next page, you can add the details about your book including the book title & sub-title. I have entered mind as follows;

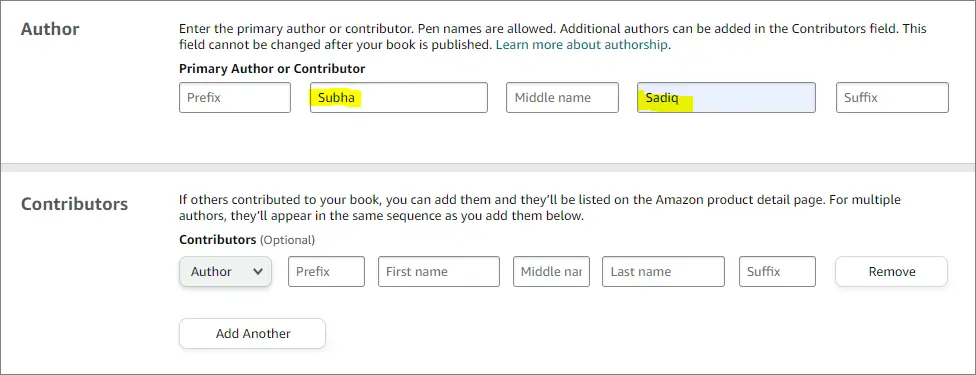
Next, you can enter book author and contributor information. You can enter your first and last name as the author’s name or add a pen name.
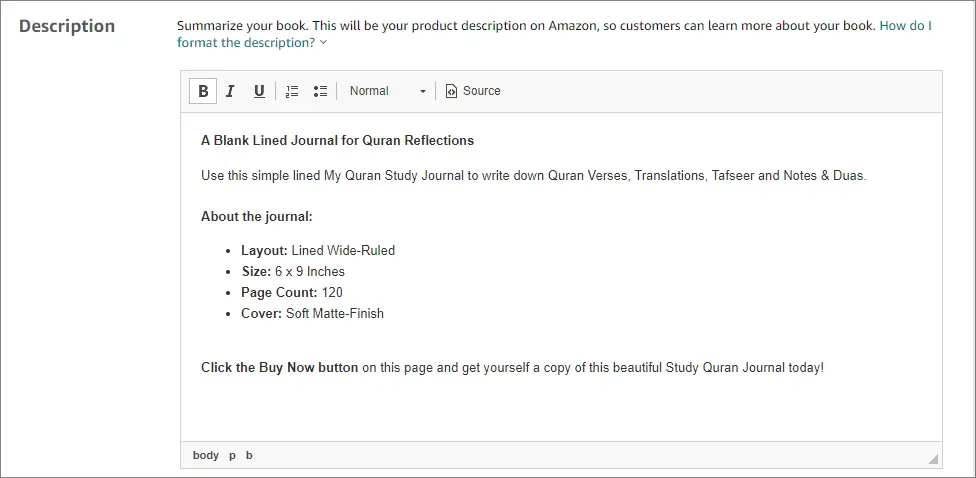
Next comes the book description, here you can enter the details about your book what is your book about and how can it be beneficial for the customer.
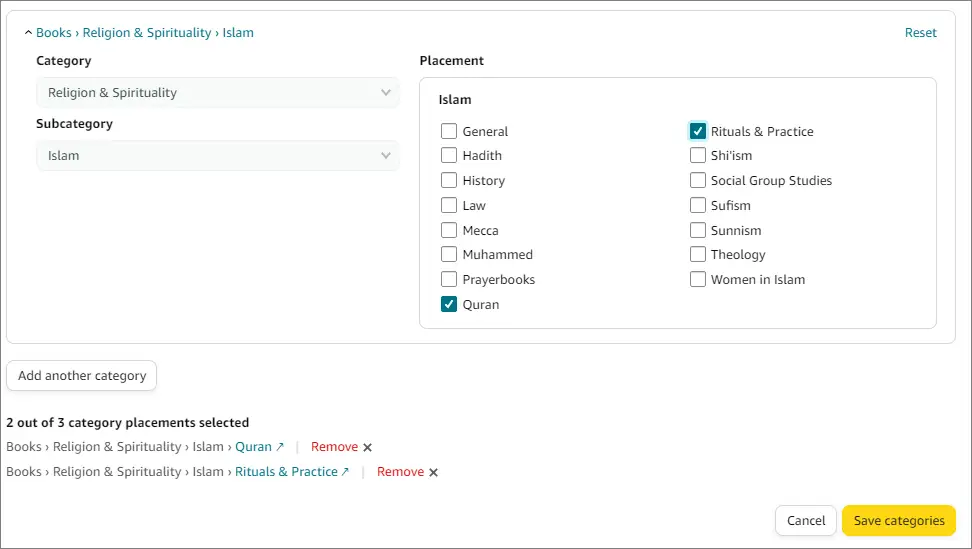
Then you can scroll down and choose 1 to 3 most relevant kdp categories for your book. First, you can select a main category and then sub-categories.
If you are publishing a low-content book like a journal, diary, or notebook then you need to indicate that by checking the box that says “Does your book classify as any of these types? Choose all that apply.”
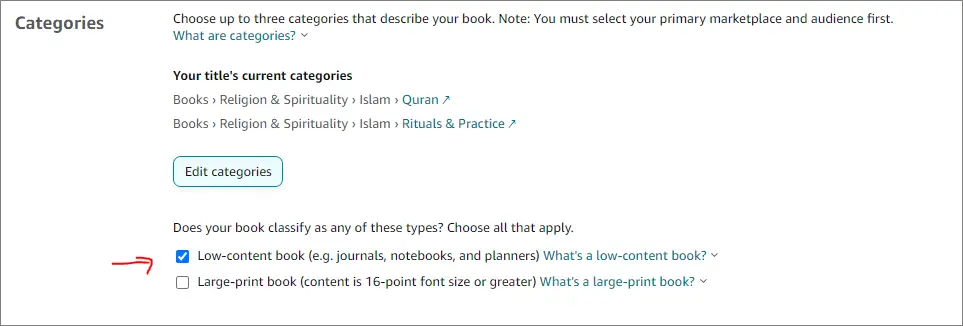
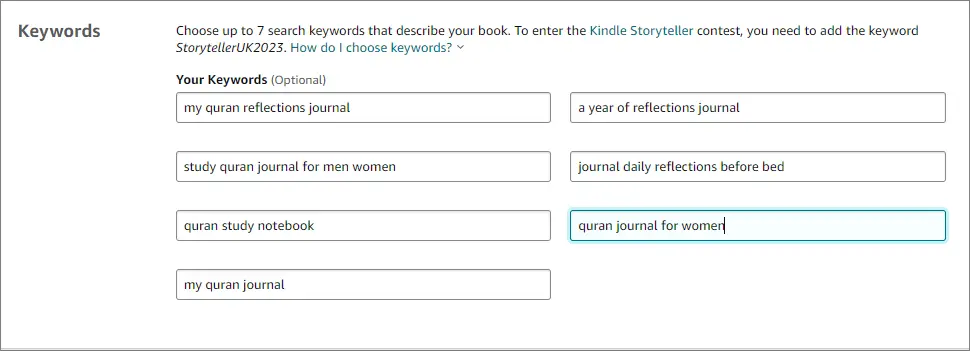
You can leave this unchecked if you are publishing a medium-content or high-content book. Lastly, you need to fill in the 7 keyword slots for your book. Here you can enter keywords and phrases that describe your book.
Once you have finished entering these book details, you can click on “Save and Continue” from the bottom right.
Step 2: KDP Book Content
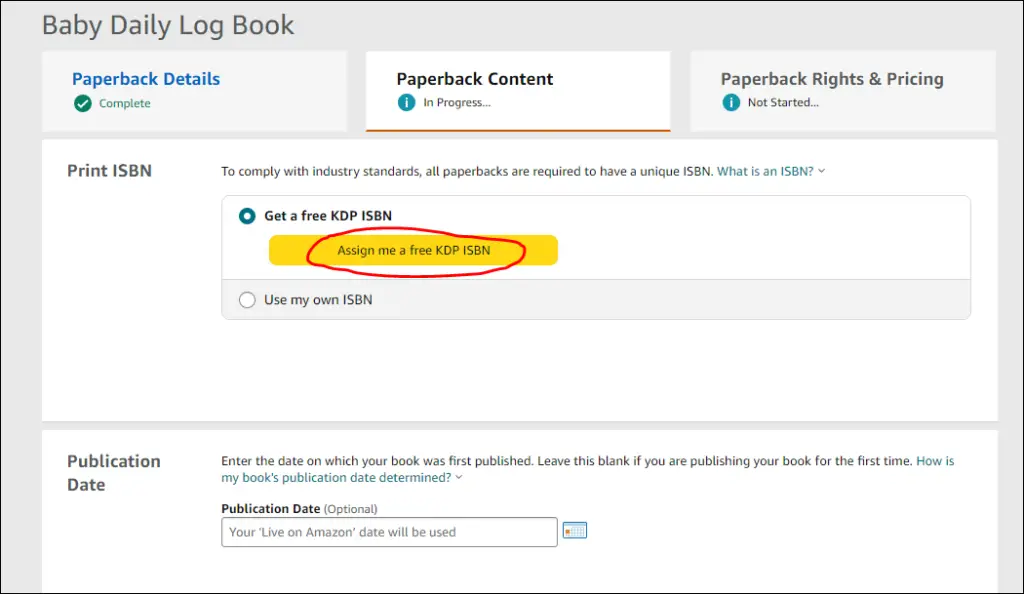
This is the 2nd page/step of uploading your book on Amazon. Here you will be uploading your book interior and cover file. The very first thing you see on this page is KDP ISBN settings.
If you are publishing a medium-content book like a storybook, puzzle book, or high-content book, kdp will show you an option to assign a free kdp ISBN number.
However, if your book is a journal or diary (low-content book) and you have identified the same on the previous page then you can publish it without an ISBN number.
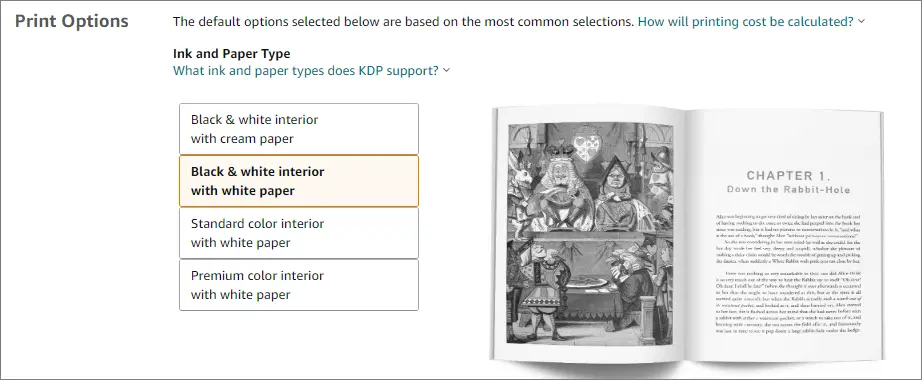
Next comes, the print option. Here most traditional books use the second option which is “Black and white interior with white paper”.
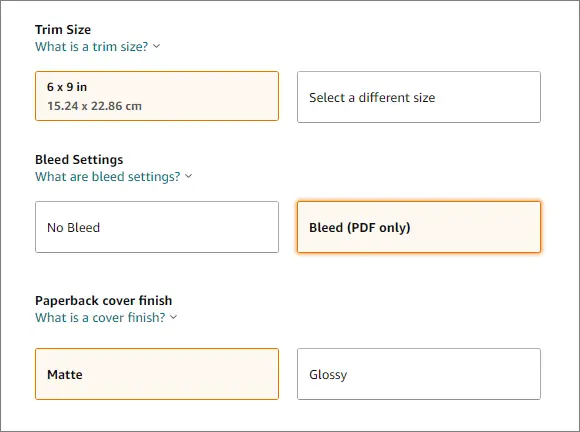
Under trim size settings, you can select book dimensions, bleed settings, and paperback cover finish. You can learn more about these settings by clicking on the blue link under each setting.
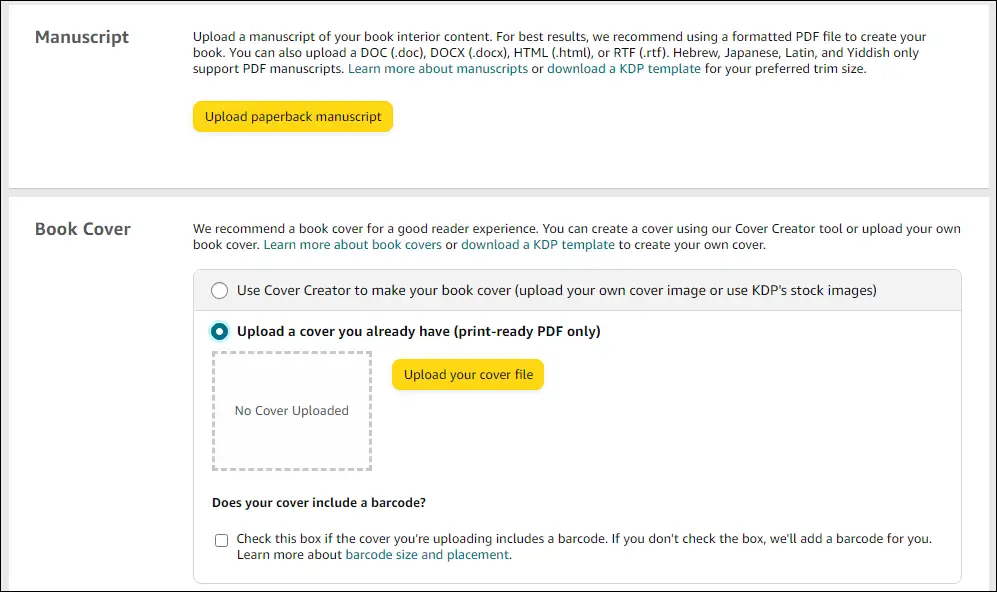
Next, you can upload your Amazon book interior and cover files. These are files you created following step 1 and step 2 of this blog post.
After kdp finishes processing your book files, you will be able to preview the digital version of your book. The processing can take from a few minutes to an hour depending upon the size of your book.

Just click on the Launch Previewer and it will take you to the next page where you can see both your book cover and interior like a flip book.

Here, you need to carefully review both your book cover and book interior. If kdp finds any issue with one or both of your files. You will have to rectify those issues and reupload your files.
In my case, there is no issue with my book files. Therefore, I can go ahead and click the approve button.
Next, you can click on the “Save and continue” button to move on to the third and final step which is paperback rights and pricing.
Step 3: KDP Paperback Right & Pricing
On this third and final page, you can choose the marketplace where you want to sell your book. I selected all territories (worldwide rights) and the United States as a primary marketplace.
Next, you can move on to the pricing section. Here amazon kdp shows you the minimum price for each marketplace based on your book content settings.
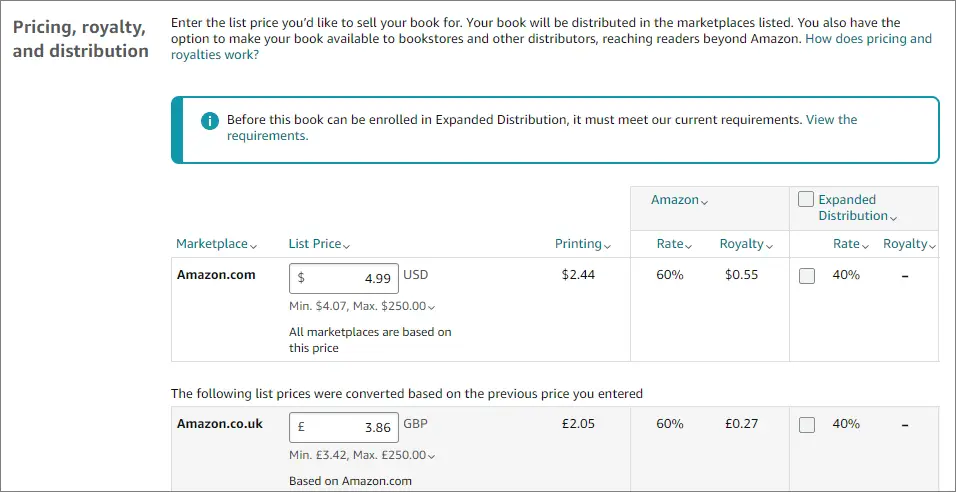
Kdp also shows you the printing cost and the potential royalties you will be earning per copy sold. Initially, you can go with a lower price and once your book gets some positive reviews you can raise the price a dollar or two.
Finally, you can hit the “Publish Your Paperback Book” to submit your book for a review which can take up to 72 hours.
If kdp team finds no issues with your book, it should go live after review. Once your book is live, it can take a few hours to fully display the book info and cover on the sales page.
Congrats! You are a self-publish author now:)
Conclusion!
In this blog post, I have shown you the step-by-step process of self-publishing a paperback book on Amazon via Kindle direct publishing. Self-publishing your books on Amazon is one of the best passive income ideas and I doing this for six years or so.
I hope you’ve enjoyed reading this blog post and found it useful. If you did, then do share it with your family and friends!
Thanks for sharing it!
Subha

