How To Create Stunning Maze Puzzles In PowerPoint For Amazon KDP!
Last updated on February 13th, 2026 at 11:22 am
Welcome to my blog! My name is Subha Malik and in this blog post, I will teach you how to create maze puzzles for kdp in MS Powerpoint.
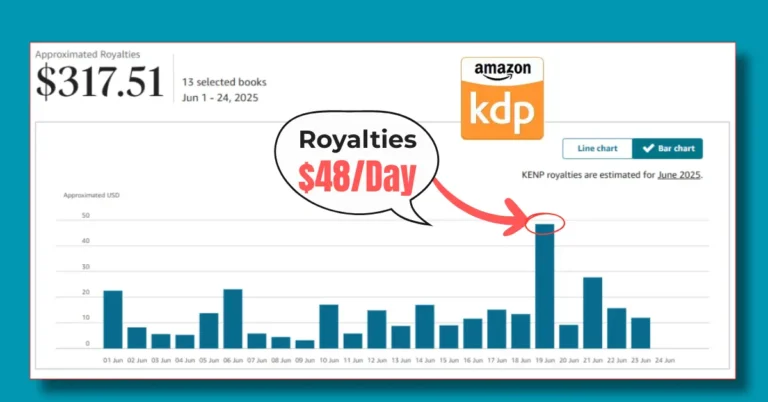
Maze puzzle books are prevalent on amazon kdp and you can enter into this profitable kdp niche too. But before creating any maze puzzle book make sure you have done your niche research and found some low competition keywords.
Now the real question is, can we use these puzzles only for amazon kdp? Not really! You can print these maze puzzles use them for yourself or sell them on other platforms like Etsy, Teachers Pay Teachers, and other similar platforms.
Let’s move on to the how part of creating maze puzzles in PowerPoint.
How To Create Maze Puzzles in PowerPoint For Amazon KDP
🎁 Download 15 FREE KDP Interior Templates
Save time and create beautiful low-content books faster with these 15 ready-to-use KDP interiors — completely free! Perfect for journals, planners, and activity books.
To create maze puzzles in PowerPoint you will need to install PowerPoint Add-In – Puzzle Generator. It’s an amazing PowerPoint add-in that lets you not only create maze puzzles but a ton of other puzzles as well.
If you are new to this little PowerPoint add-in then you will be amazed to know that…
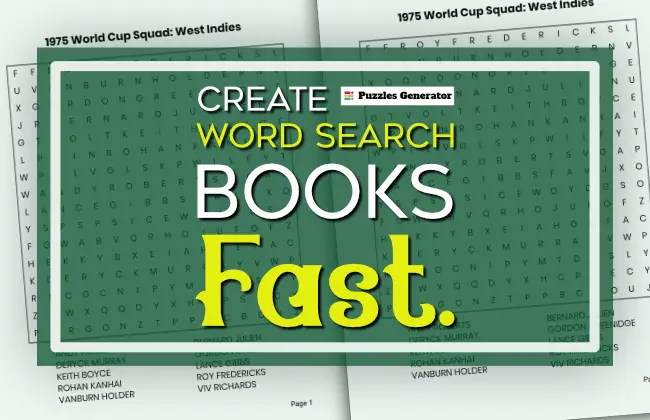
With This PowerPoint Add-In – Puzzle Generator you can quickly bulk create word searches, crosswords, mazes, sudoku, coloring book pages, cryptogram, word puzzles, word scramble puzzles, mine finder, warship puzzles, hangman puzzles, tic tac toe grids, tic tac toe logic puzzles, nurikabe puzzles, Hitori puzzles, 4 in a row grids, skyscraper puzzles & ABC Path puzzles for multiple page sizes.
I have also shared a quick overview of this PowerPoint Puzzle Generator. You can check it out here: Puzzle Generator PowerPoint: Quickly Create Puzzles for KDP Low Content Books
Without further ado, let’s just dive in…
Below you will find a step-by-step process to create a maze puzzle inside PowerPoint using a puzzle generator add-in.
Step # 1 – Download and Install Puzzle Generator Add-in
You can get the Puzzle Generator add-in from Gumroad by visiting the link below;
Note: this is paid software and costs you around £7.99 / mon if you get a monthly subscription and £6.66 / month if you purchase a quarterly subscription. Semi-annual and annual subscriptions are cheaper as compared to monthly and quarterly subscriptions.
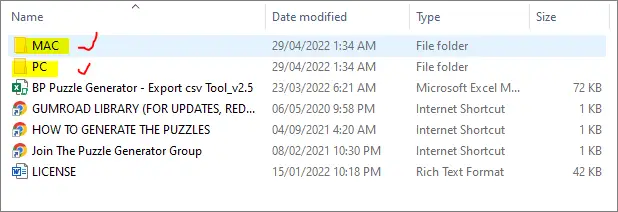
With your purchase you will receive a zip file, just extract it and you will find two different sub-folder for MAC and Windows. Just open the relevant folder and double-click the setup file to install. Once installed restart PowerPoint if already opened, and you will see a tab in the top menu with the name of puzzle generator.
Step # 2 – Choose Trim Size and Bleed
Once you click on the puzzle generator tab in PowerPoint, you will see an option to choose a trim size and bleed settings from the top left corner. Have a look at the screenshot below;
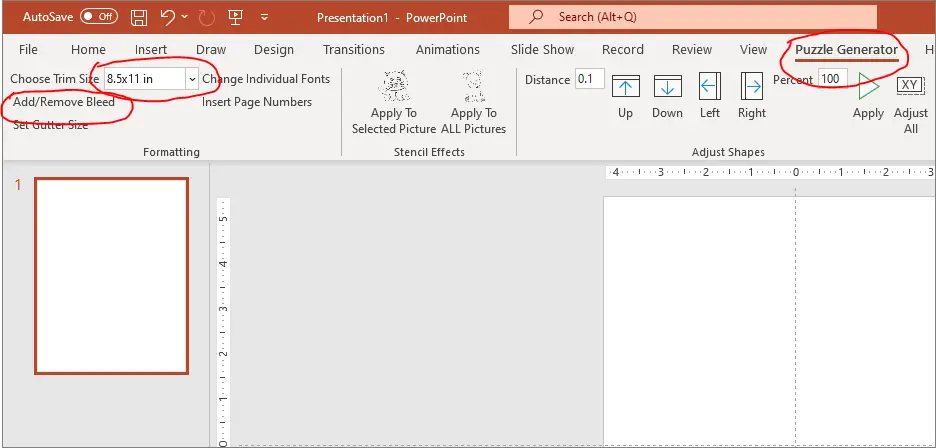
For the sake of this blog post, I am choosing a trim size of 8.5×11 inches and leaving the bleed setting as is. This will resize the slide size to 8.5×11, and this would be without bleed as I haven’t clicked on the add/remove button.
Step # 2 – Choose The Maze Puzzle
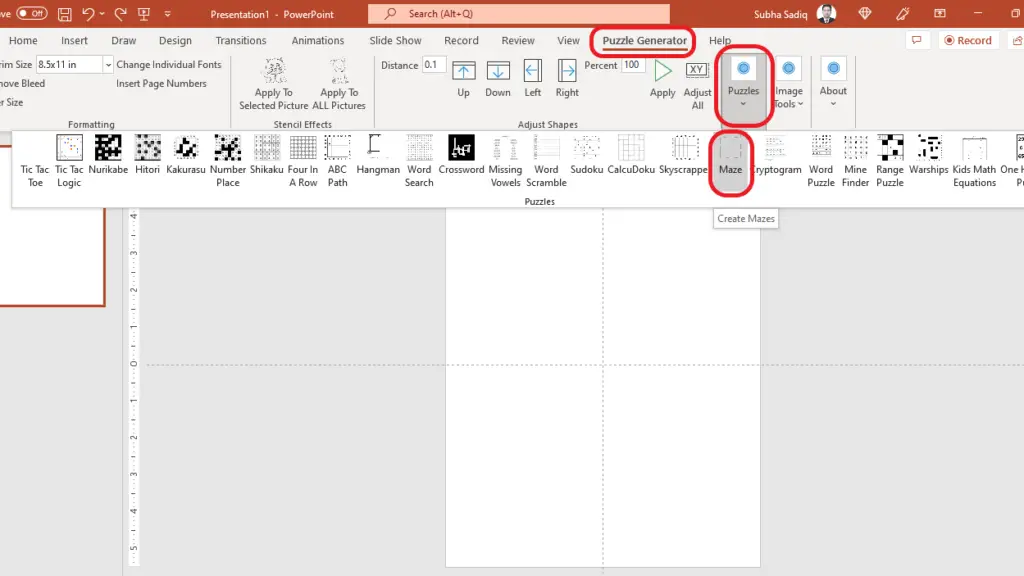
As I have already mentioned, the puzzle generator add-in allows you to create a lot of different puzzles including mazes. Right now we are interested in maze puzzles only! To select the maze puzzle option you need to;
- Click on the puzzle generator tab
- Click on the puzzles
- Click on the Maze from the drop-down menu
To better understand it, refer to the screenshot below;
Step # 3 – Start Creating Maze Puzzles
Once you click on the Maze puzzle option you will see a popup window like this;
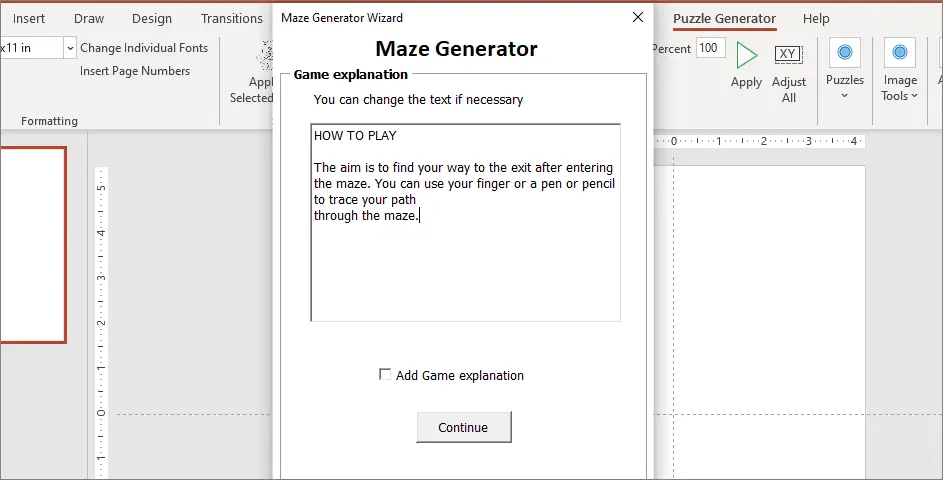
This basically shows the game explanation and gives you an option to include this how to play instructions at the start of your puzzles. You can add your own text as well. I am just skipping it at the moment.
Just click on the next Continue button, and you will be presented with the maze customizations window. Here you can set the difficulty level, add a title to your maze and change the colors and margins.
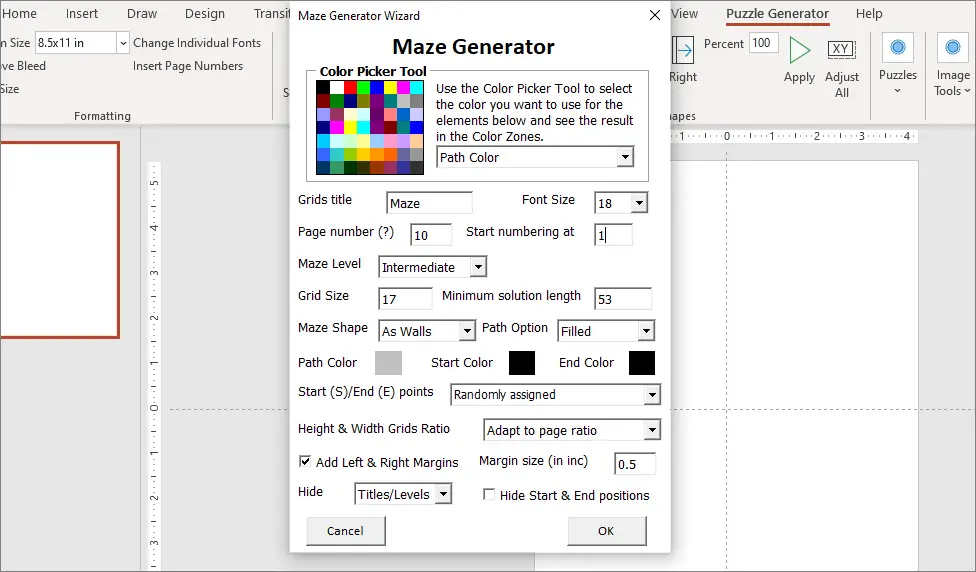
Below I will be discussing each customization option in a bit more detail so that you can have a better understanding of the process.
Path Color, Start Path Color, and End Path Color
This is the very first option in the maze generator. You change the solution path color, path start color (the start arrow), and the path end color (the exit arrow).
For example to change the path color, just select the path color option then click on one of the colors in the color picker tool, then down below you will see the result. The screenshot below explains it further;
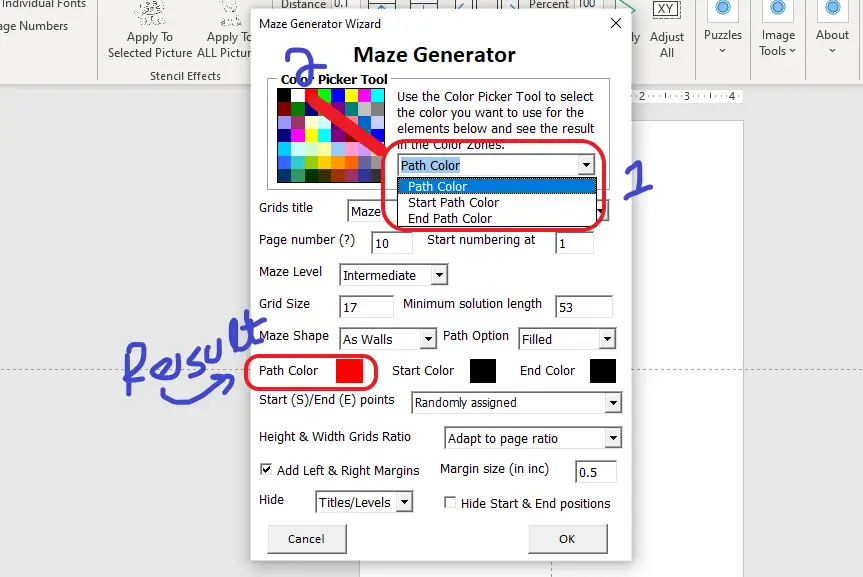
Repeat the same process with the start path color and the end path color to set the colors as per your liking. However, with kdp paperback books, you should select black or grey colors only.
Grid Title / Puzzle Title
The second option you are going to see is the ability to set your own grid title which serves as the title for your maze puzzle. By default the puzzle title is set as Maze, you can change it with something more interesting like easy mazes for kids or just Easy Maze Puzzle.
You can also change the font size of the rid title or puzzle title. Check out the screenshot below;
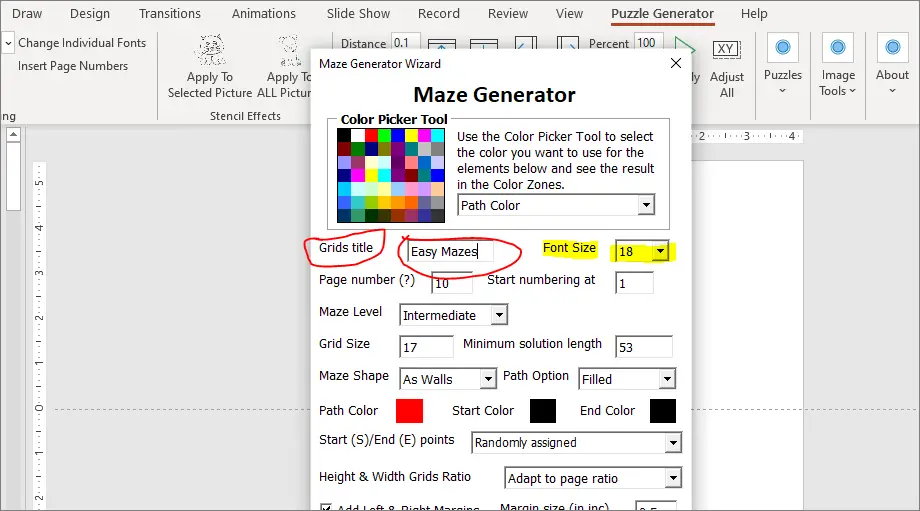
Next, you will be setting up the page numbering and the maze difficulty levels.
Page Number and Maze Level
The option of page numbers is basically the number of puzzles you want to create in one go. You can create 1 to 100 maze puzzles at a time. However, creating too many puzzles at a time can crash PowerPoint. So, you should start slow.
The next option is the maze level which basically is a difficulty level. There are 6 different difficulty levels you can choose from;
- Very Easy – To create very easy mazes for kids
- Easy – To create easy mazes for kids
- Intermediate – To create a bit challenging mazes
- Hard – To create difficult mazes for older kids and adults
- Very hard – To create very difficult mazes
- Insane – To create really complex mazes
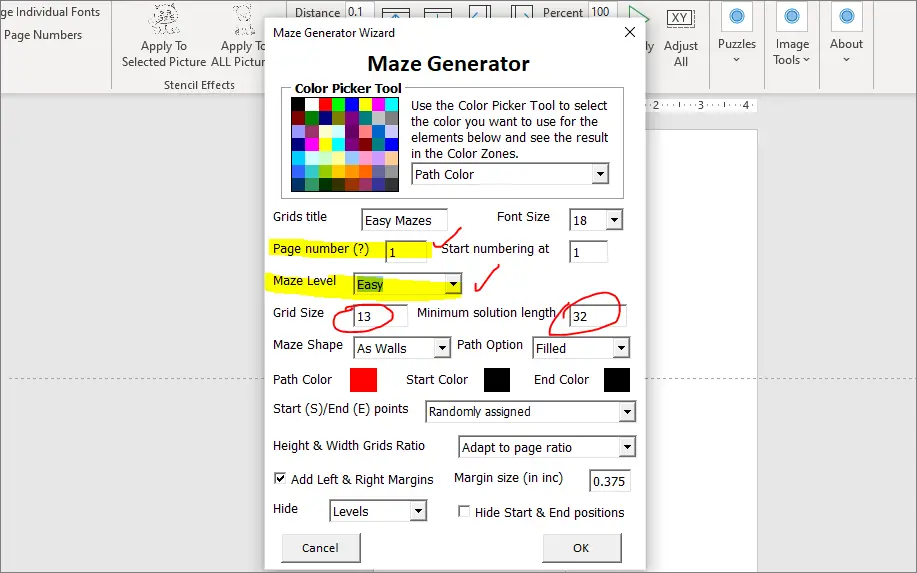
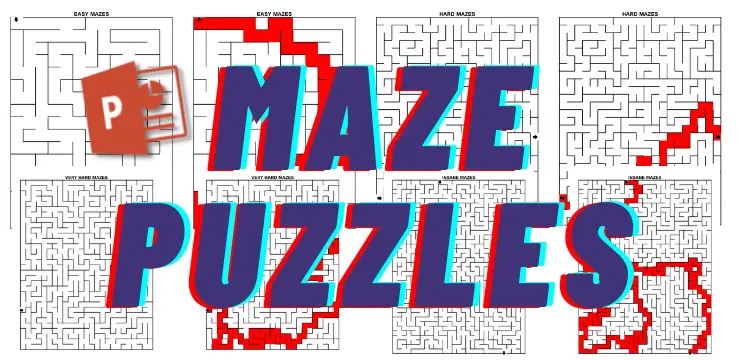
For purpose of demonstration, I have selected puzzle number 1, and difficulty level to Easy and ended up creating the below puzzle with the solution. The puzzle and the solution were on two different slides, I placed them on one canvas.
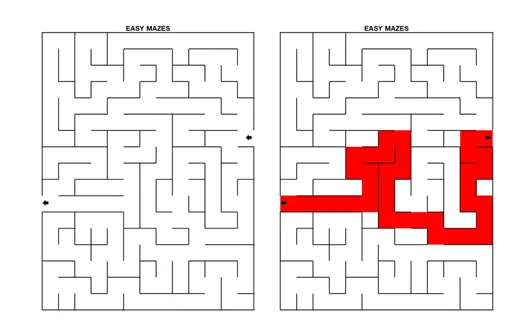
You can see the power of this puzzle generator add-in for PowerPoint. However, I would recommend doing thorough research about the difficulty level and the age group first to create a maze puzzle.
You can also enter your own grid width and minimum solution size by entering the numbers into the relevant boxes just below the maze level.
Maze Shape and Path Option
Next, you can set the maze shape to “as walls” or “as blocks” and the path option to either a “filled path” or “as line”.
In the example puzzle above, I have selected maze shape as walls and the path option to filled, that’s what liked it to be.
Start and End Points
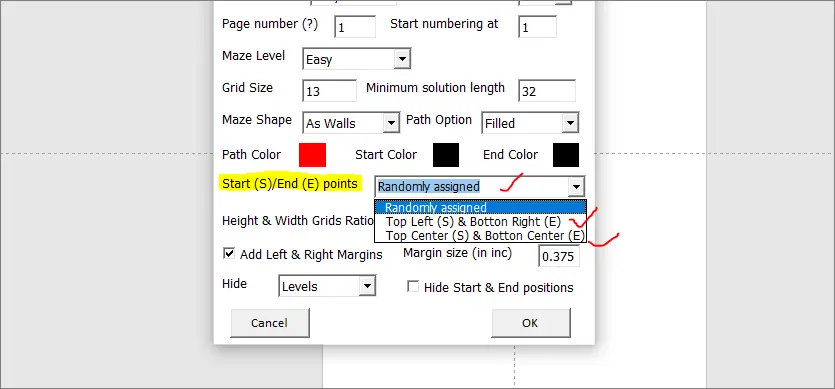
This option lets you set the position of the start and end point on the puzzle page. There are three different settings you can use for the start and the end points.
These setting include;
- Randomly assigned – Every puzzle will have a different position for start and end points.
- Top Left (S) and Bottom Right (E) – The start points would on the top left of the puzzle and the end points toward the bottom right.
- Top Center (S) and Bottom Center (E) – The start points would be on the top center of the puzzle and the end points toward the bottom center.
Height & Width Grids Ratio
This customization setting allows you to choose a height and width ratio for the puzzle grids. There are two options you can choose from;
- Adapt to page ratio
- Keep square
I like to go with the first option that adjusts the puzzle height and width to that of the trim size.
Puzzle Margin Settings
Next, you can set margins for your maze puzzles! To do that you need to know the right margins for your kdp interior templates.
As per kdp you, for a book of 24 to 150 pages, margins are as follows;
- Inside margin: 0.375 at least
- Outside margin: 0.25 In (without bleed) and 0.375 In (with bleed)
However, I like to add a 0.5-inch margin all around for maze puzzle books. Therefore, I am going to check the box that says “Add left and right margins” and then set the margin size to 0.5 inches.
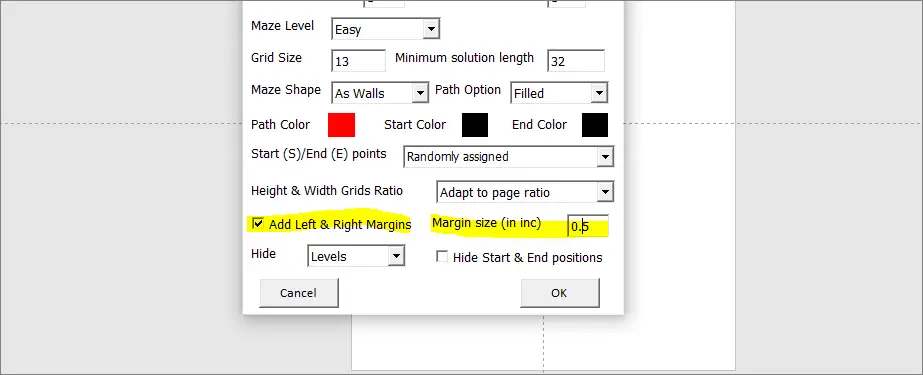
Now, let’s move on to our final customization settings for our maze puzzles.
Hide Titles, Levels, Start and End Points
The final customization you can do with the maze generator is playing around with hiding or unhiding puzzle titles, levels, start and end points.
For a better understanding of these settings just see the screenshot below;
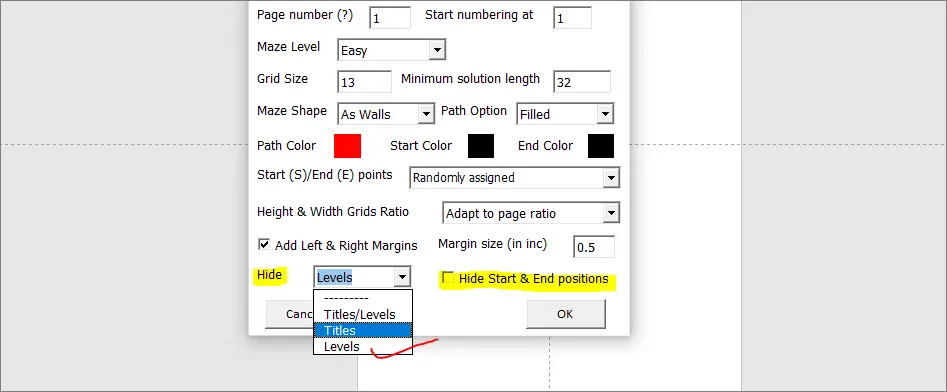
I like to hide the maze levels only and I don’t feel the need for them! Part of that is the title itself shows the difficulty level of the puzzles (Easy mazes, Intermediate mazes, or Hard mazes).
That’s it. Once you are done with the customization settings you can click on the OK button and the maze generator to start generating unique maze puzzles for you!
My Verdict
Maze puzzle books are extremely popular on amazon and can be really profitable as well. However, maze puzzles are not easy to make if you do them manually. Therefore, you can use some software like the Powerpoint Puzzle Generator Add-in to generate maze puzzles with ease.
I only recommend products and tools that I personally use, therefore, you can rest assured that the puzzle generator is a useful tool as well.
Thanks for reading this post till the very end…if you’ve found it helpful then do share it with your friends!
Thanks for sharing it😊
👉 Read Next: How to Create a Large Print Sudoku Puzzle Book That Sells on Amazon (Step-by-Step)
Want to Publish Your First Amazon KDP Book the Right Way?
I created a beginner-friendly Amazon KDP course that walks you through niche research, book creation, and publishing — step by step.
👉 Access the Amazon KDP MasterclassPerfect for beginners starting with low- and medium-content books.

