KDP (short for Kindle Direct Publishing) is a service by Amazon that allows people to self-publish an ebook or paperback book using their lap and internet connection only. As a self-publish author or kdp publisher, you can publish your very first book in a matter of days.
In summary, when you publish a book on KDP, once approved your book goes live on amazon’s website where potential buyers can view and buy a copy of it. The best part is you get paid a cut of the purchase amount every time someone orders a copy of your book.
On kdp, you can publish 3 types of books:
- An ebook
- A Paperback Book
- A Hardcover Book
In general, you can publish an ebook first then launch a paperback version and a hardcover cover version of your ebook. In this way, you will be able to generate 3 sources of passive income from one piece of content.
When I first started with amazon kdp, I published an ebook back in May 2017. At that time there was a separate platform for paperback books known as Createspace, therefore, I used to publish my paperback books via Createspace. In July 2018, Createspace was merged into kdp and my paperback books were moved to kdp as well.
Related post;
..........
My Recommended Courses to Make $500 to $1000/Month
The LCB Vault: Get 50% Off With Coupon Code Subha
KDP Masterclass By Self Publishing Titans: Get 20% Off with Coupon: Easter
..........
How To Get Started With Kindle Direct Publishing
Getting started with kdp is as easy as 1,2,3 go. All you need is to head over to kdp.amazon.com and sign up for a free account, that will take you a few minutes only.
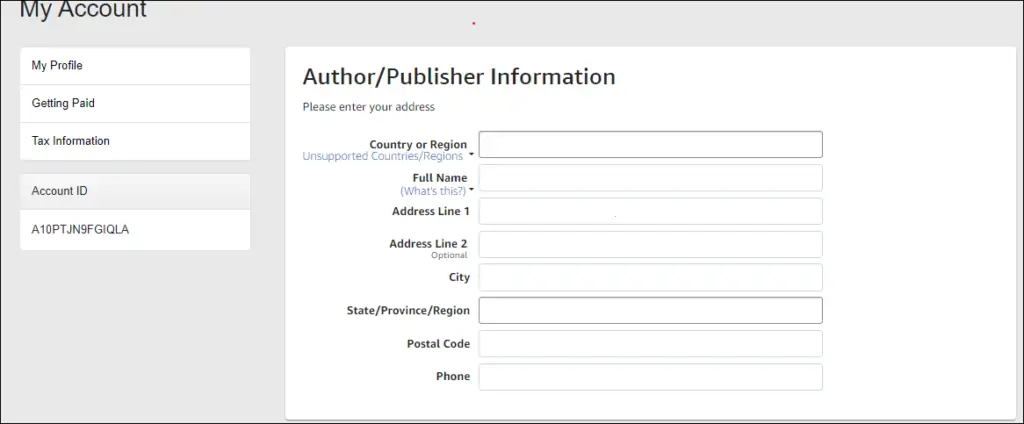
You need three things to complete your profile on amazon kdp:
- Autor or Publisher Information: Includes your full legal name, your country of residence, your address, postal code, and a phone number.
- Getting Paid: It includes your bank information to receive electronic royalty payments.
- Your Tax Information: Kdp also requires you to complete your tax information.
If you already have an amazon account then you can log in to kdp using the same username and password. Here, you will need to add your payment details and tax information, and you are all set up.
If you are living outside of the USA, then you can use Payoneer to receive a royalty payment from amazon kdp. Payoneer provides you with a fully functional US bank account number that you can enter on kdp and start receiving earnings from your books.
Once, you have completed the sign-up process you will be ready to publish your very first book via amazon kdp.
What Can You Sell On Amazon Kdp
Amazon kdp was first launched in November 2007 as an ebook platform. It was when amazon launched their very first kindle device or kindle reader. Kdp earned a huge success as an ebook publishing platform and is known to cover 80% of the ebook world.
Later on, in 2016 kdp also added a paperback option which works as a print-on-demand service for books and it lets publishers publish a paperback version of their ebooks. Hence, buyers can order a paperback version of their favorite ebooks.
During 2021 kdp also launched hardcover books, which allows self-publish authors to sell hardcover books along with ebooks and paperback books.
On amazon kdp, you can sell ebooks, paperback books, and hardcover books and earn passive income online. Under the paperback and hardcover option, you can also publish simple lined journals, planners, sketchbooks, blank recipe books, coloring books, activity books, puzzle books, and many more no and low-content books on kdp.
It is free to get started and you can publish your very first using your internet connection and a laptop or pc.
How To Publish Your First Low Content Book On Kdp
As I already mentioned in this blog post, kdp allows you to publish no content and low content books and earn passive income every single month. I myself have published a ton of no content and low content books on kdp during the last almost years.
To publish your very first low content book on kdp, you need to have your book interior and book cover ready. The good news is you can create both kdp interiors and cover for free using online software called Canva.
Below I will walk you through step by step process of creating your kdp interior and kdp book cover in Canva. You can follow along and create your book as well. So let’s dive in…
Getting Kdp Interiors Ready!
For the sake of this guide, I am going to create a Baby Log Book or Daily Baby Log with the dimensions of 8.5 x 11 inches.
To have an idea of the type of interior I first checked already published books on Amazon and then I downloaded a ready-made interior from Creative Fabrica.
Next, I have created the interior inside Canva to make sure it looks different from the book interior I have downloaded from Creative Fabrica. This step is crucial as you don’t want your book to look exactly like everyone else’s book.
Below is the before and after images of the Daily Baby Log Book.
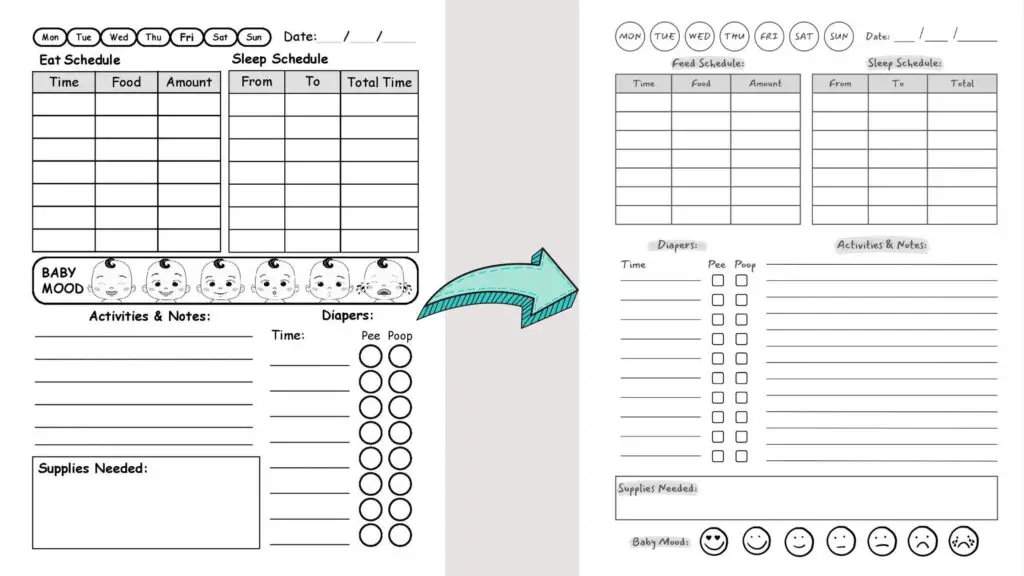
You can see I have changed certain elements including fonts, shapes, and position of the elements on the page. In this way, my final interior looks much different than what I have downloaded from creative fabrica.
You can easily create kdp low content book interiors in Canva using different elements like shapes, tables, text boxes, lines, and emojis.
Getting Your Kdp Book Cover Ready!
Before creating a cover for your kdp book, you need to have the right book cover dimensions. For example, I am going to create a cover for an 8.5 x 11-inch book with 120 pages. To have my book cover dimensions, I will head on to the kdp book cover calculator on the below link:
https://kdp.amazon.com/cover-calculator
On that page, I have entered my book information and clicked on calculate dimensions. You need to do the same to have your book cover dimensions.
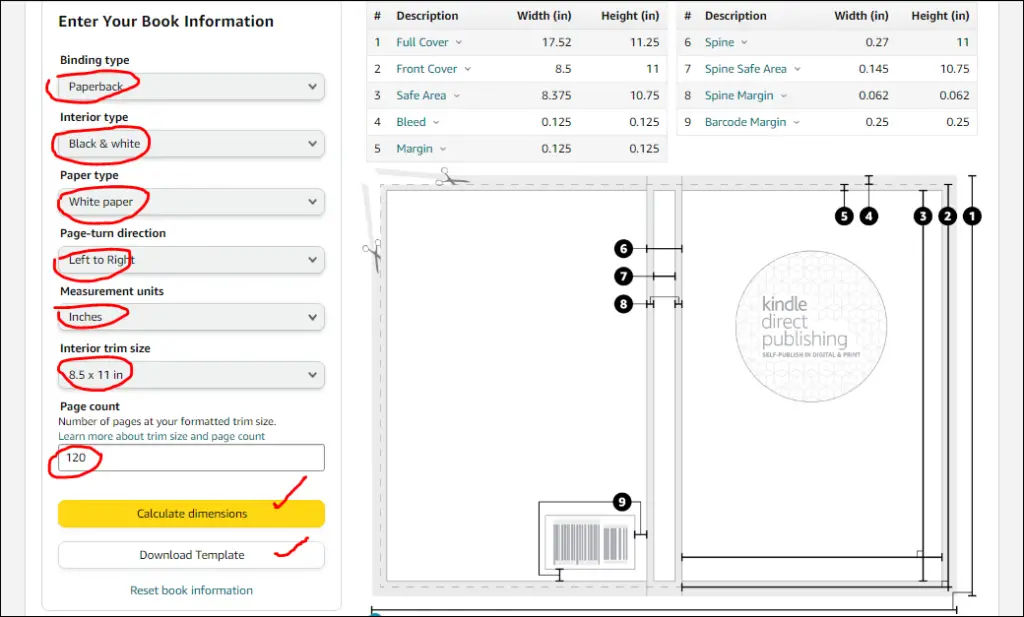
As you can see I have selected the following options for my baby log book:
| Binding Type | Paperback |
| Interior Type | Black & White |
| Paper Type | White Paper |
| Page-Turn Direction | Left to Right |
| Measurement Units | Inches |
| Interior Trim Size | 8.5 x 11 In |
| Page Count | 120 |
So, based on this information you can see my cover dimension are 17.52 x 11.25 inches to create a full paperback cover where:
Cover With Is = Front Cover + Back Cover + Book Spine + Bleed
= 8.5 In + 8.5 In + 0.27 In + 0.25 In
= 17.52 In
Cover Height Is = Front / Back Cover Height + Bleed
= 11 In + 0.25 In
= 11.25 In
Like the book interiors, you can also create a very good-looking book cover inside Canva for free. I usually create a front cover then create a full kdp paperback cover using that front cover.
To create the first cover, I have created a new document of Canva of 8.5 In x 11 Inches. Then from the left side, I have clicked on Templates and typed baby in the search box to find relevant cover templates.
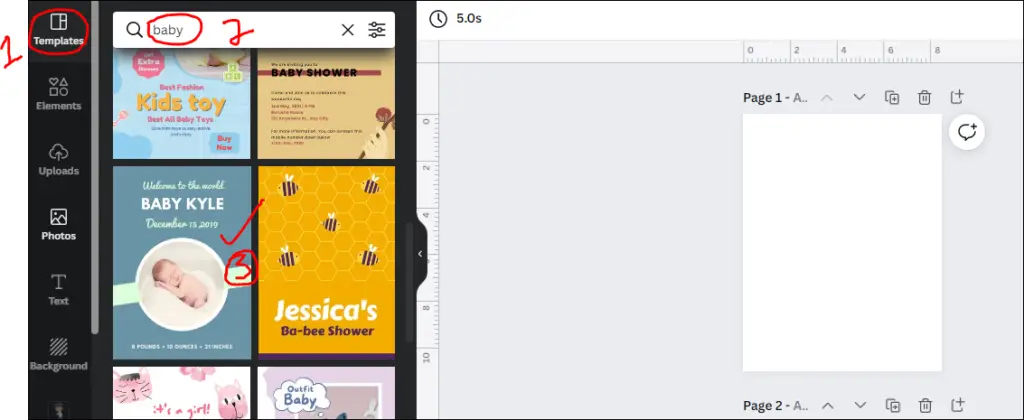
Next, canva has shown me a wide range of templates that I can use and customize to my liking. I have clicked on the following template as it looks very close to the book cover I am going to create.
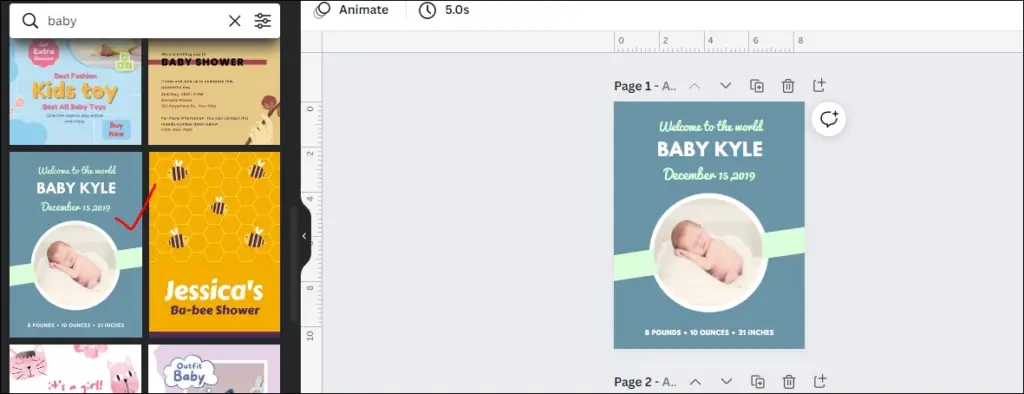
Next, I have made changes to the template, like I have deleted all the text boxes, changed the position of the main image, change the size of shapes, and finally added an image of my book interior as the background image.
And here is the final outcome after making the aforementioned changes.
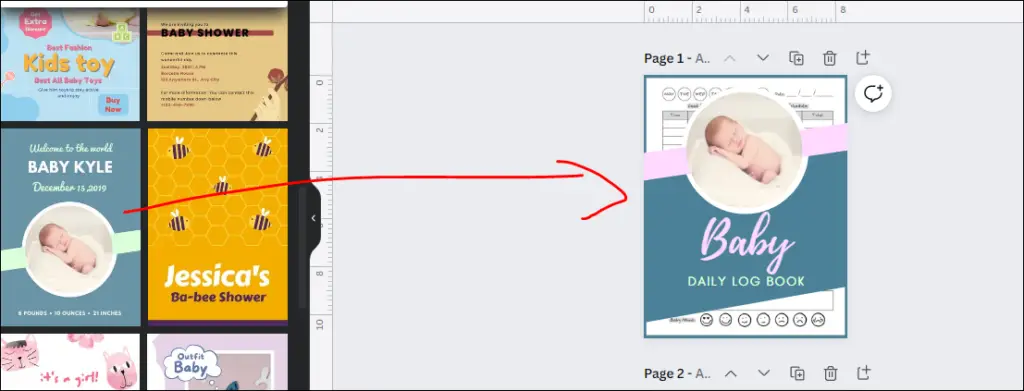
Once happy with my front cover, I have downloaded my front cover as a Pdf file and then converted that pdf file to a jpg file using a free pdf to jpeg service. I did this to make sure I am downloading my cover in the best possible quality.
Side Note: If you directly download your cover from canva as JPG or PNG, it would be a lower quality file.
Creating Full KDP Cover In Canva
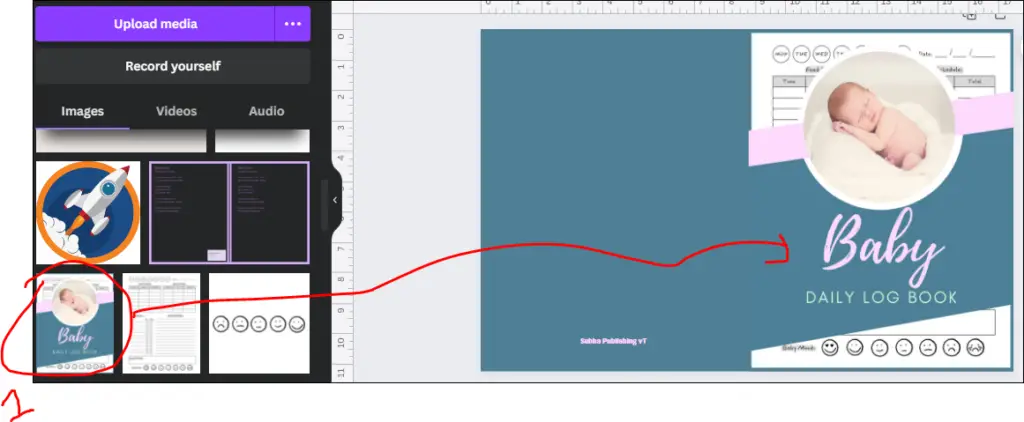
Next, I have created a new blank document with the dimensions of my full kdp cover which are 17.52 x 11.25 Inches. Then I uploaded my previously downloaded JPG cover and set it as front cover then I changed the background color to match with the front cover.
Now my full kdp cover is ready and I can download this as a PDF Print file, which I actually did. This makes our kdp cover ready for upload.
Creating KDP Book Metadata!
Once you are done with your book cover and interior, your next step would be to write book metadata that includes Book Title, Subtitle, and Book Description.
To better describe this, I am going to share my own book’s metadata.
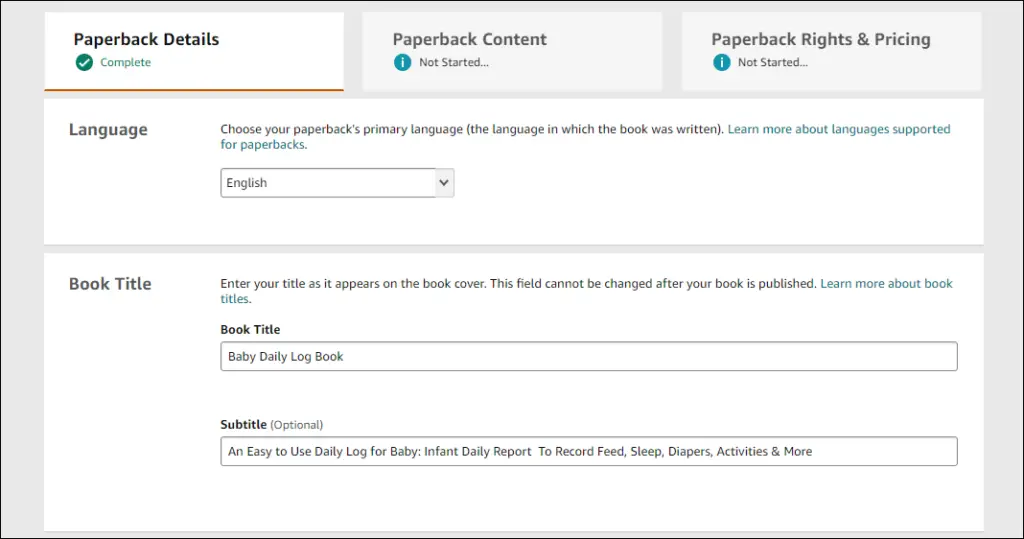
Book Title: Baby Daily Log Book
Sub-Title: An Easy to Use Daily Log for Baby: Infant Daily Report To Record Feed, Sleep, Diapers, Activities & More
Book Description:
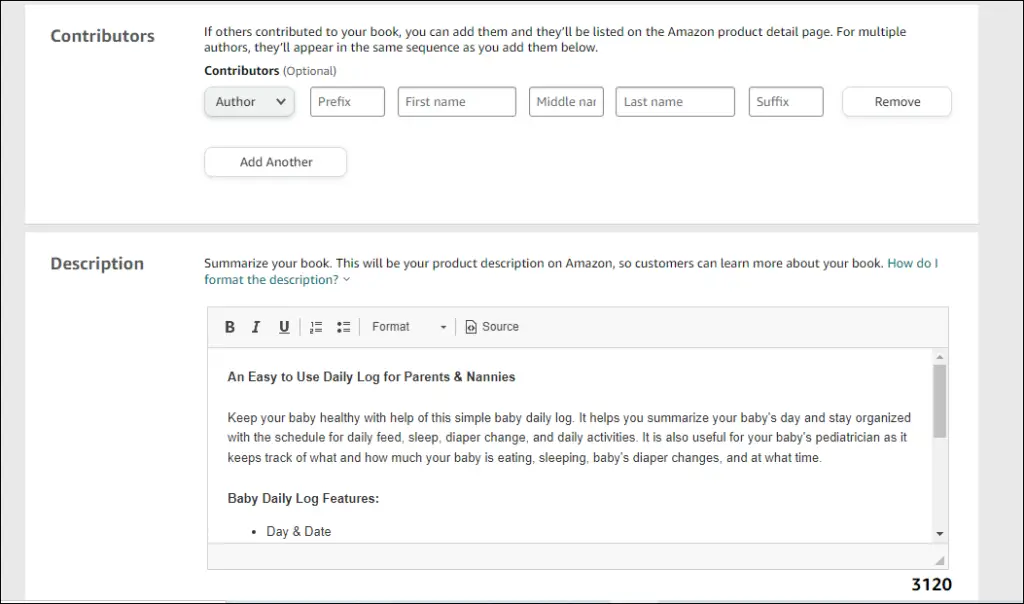
An Easy to Use Daily Log for Parents & Nannies
Keep your baby healthy with help of this simple baby daily log. It helps you summarize your baby’s day and stay organized with the schedule for daily feed, sleep, diaper change, and daily activities. It is also useful for your baby’s pediatrician as it keeps track of what and how much your baby is eating, sleeping, baby’s diaper changes, and at what time.
Baby Daily Log Features:
- Day & Date
- Feed (time, food, and amount)
- Sleep and naps (duration and time)
- Diapers (time, poop, pee)
- Activities & Notes
- Supplies Needed
- Baby Mood
Makes a perfect gift for new parents, baby showers gifts, and new moms and dads who use nannies often.
To grab a copy just click on the Buy Now or Add to Cart button on this page!
In addition to that, you will also need to choose an Author Name, fill in 7 Backend Keywords, and pick Book Categories.
Uploading Your Book On Amazon Kdp
Next, I will walk you through step by step process of uploading your first book on amazon kdp. So, keep reading this…
Uploading a book on kdp is a 3 step process that I will show in detail. So, let’s dive in…
Step # 1 – Entering Your Book Details On Kdp
First of all, you need to click on the Paperback option from the kdp dashboard;
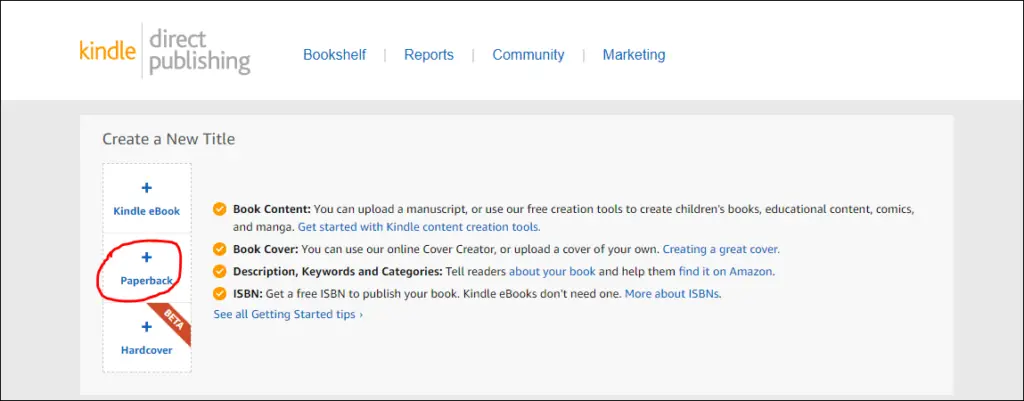
It will start the book upload process and will take you to a new page called “Edit Title Details”. Here you will need to enter your book details. Firstly, you will need to enter your book Title and Subtitle as shown below:
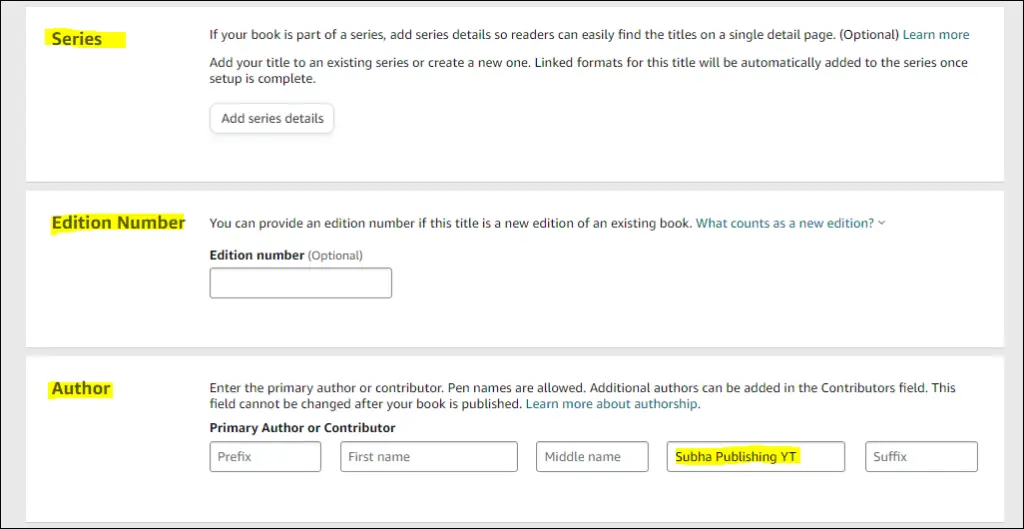
Series Name, Edition Number & Author Name
Next, you can add an optional series name and addition number, I have left this blank. Under the author section, you will need to add the primary author or contributor name, I have written mine as Subha Publishing YT. I have selected this author name to show my audience over the shoulder training.
Kdp Book Decription
Next, you can leave the Contributor section blank if you don’t have any such information and move on to the book description section. Kdp allows you to add a book description of up to 4000 characters and you can also use basic HTML formatting to add spice to your book description.
Copyright & KDP Backend Keywords
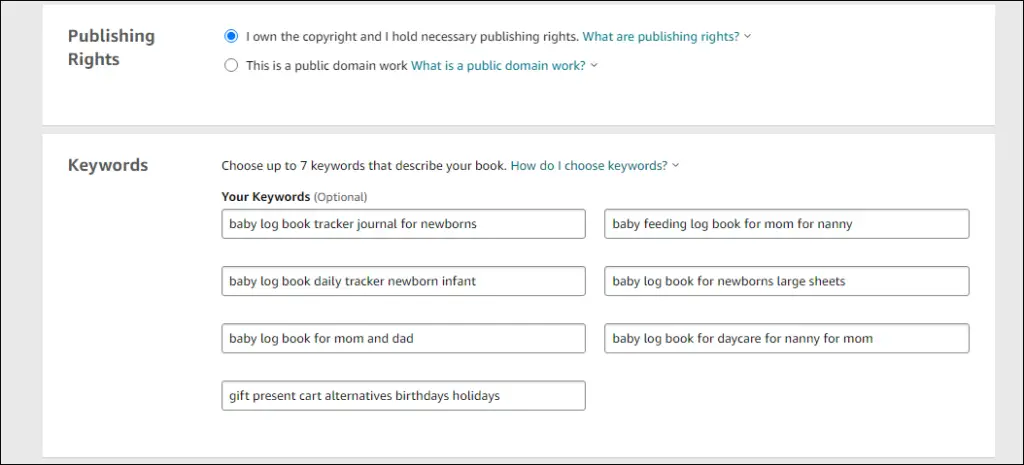
Next, you need to confirm the publishing rights by selecting the right option. As I create my books myself and I own the copyright, therefore, I always check the box which says, “I own the copyright and I hold necessary publishing rights.”
Next comes the most discussed section and it is the kdp backend keywords. Kdp allows you to add 7 keywords / phrases that describe your book’s content. I have written a detailed guide on filling in kdp backend keywords, you can read it below.
I have already filled in my kdp backend keywords, and you can have a look below.
Relevant Post – How to Use KDP Backend Keywords!
Choosing Categories for Your KDP Book
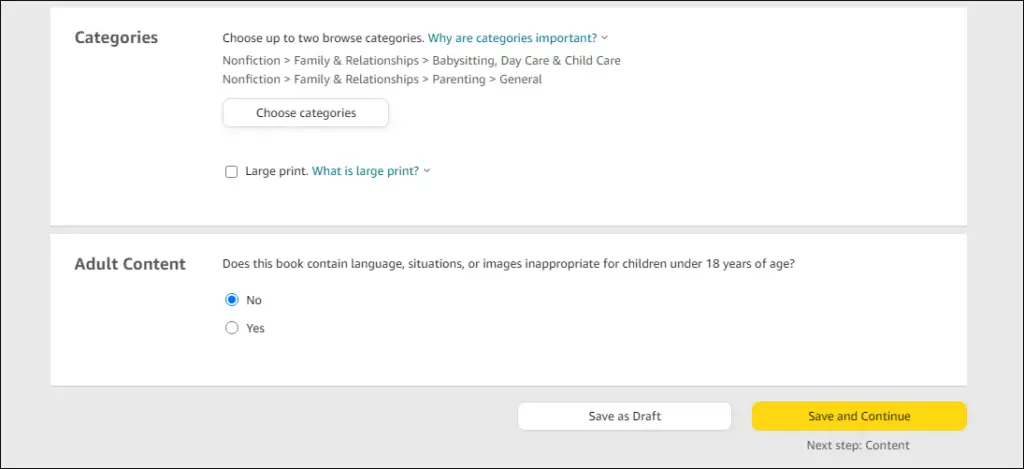
The last section on this book details page is book categories or browse paths. At the time of uploading your book, kdp allows you to select two relevant browse categories.
Relevant Post: How to Pick Categories for Your Kdp Books
I have already selected categories for my Baby Daily Log Book, which are shown below.
Step # 2 – KDP Paperback Content
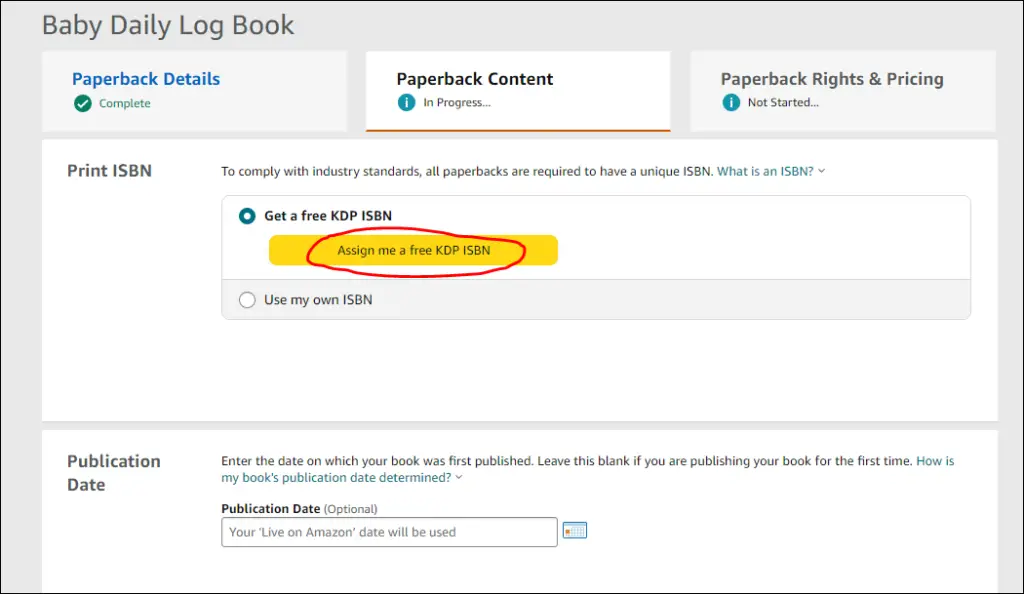
Once satisfied with your book details, you can click on Save and Continue button which will take you to the book content page where you can upload your book interior and book cover.
Here on this page, you can generate a free ISBN for your paperback book by clicking on the orange button that says “Assign me a free KDP ISBN”.
Kdp Print Options
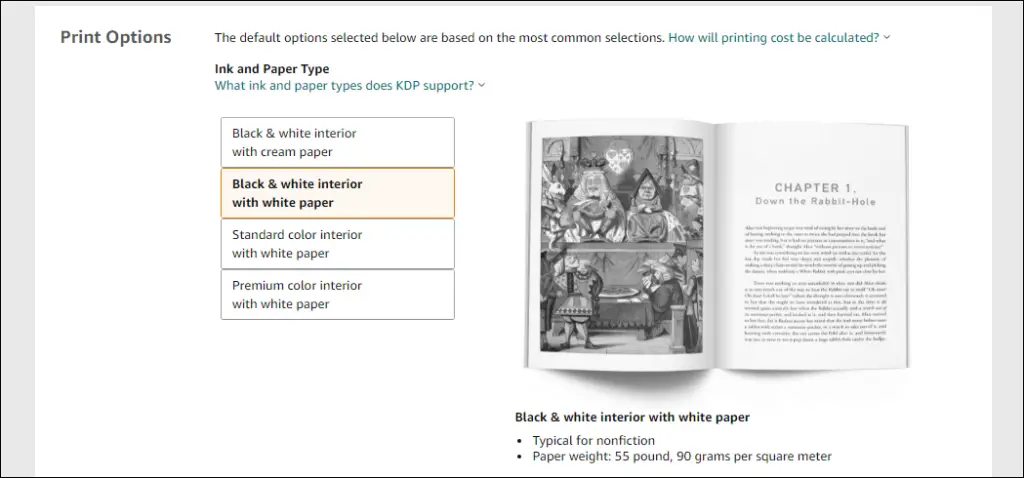
Under kdp print options you can choose the ink and paper type for your book. As you are going to publish a low content book with a lot of pages, therefore, you should select the 2nd option “Black & White Interior with White Paper”.
Kdp Trim Size, Bleed Settings & Cover Finish
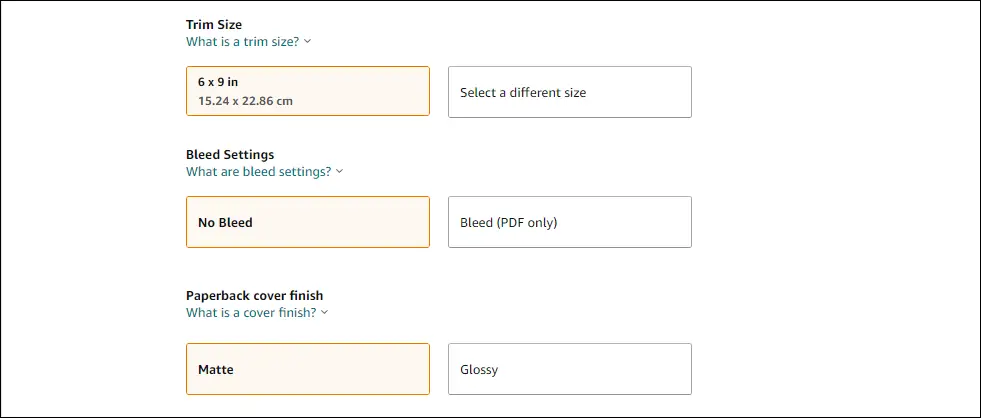
Now you need to select the trim size, bleed settings, and cover finish for your kdp low content book. I have selected 6 x 9 in as trim size, no bleed (as I have an interior with no bleed), and matte as a cover finish.
Not sure about bleed settings? Watch this video…
Uploading Book Interior & Book Cover On Kdp
Your final step on this paperback content page is to upload your book manuscript (book interior) and book cover. As you have your book interior and book cover already created, you can upload them one by one.
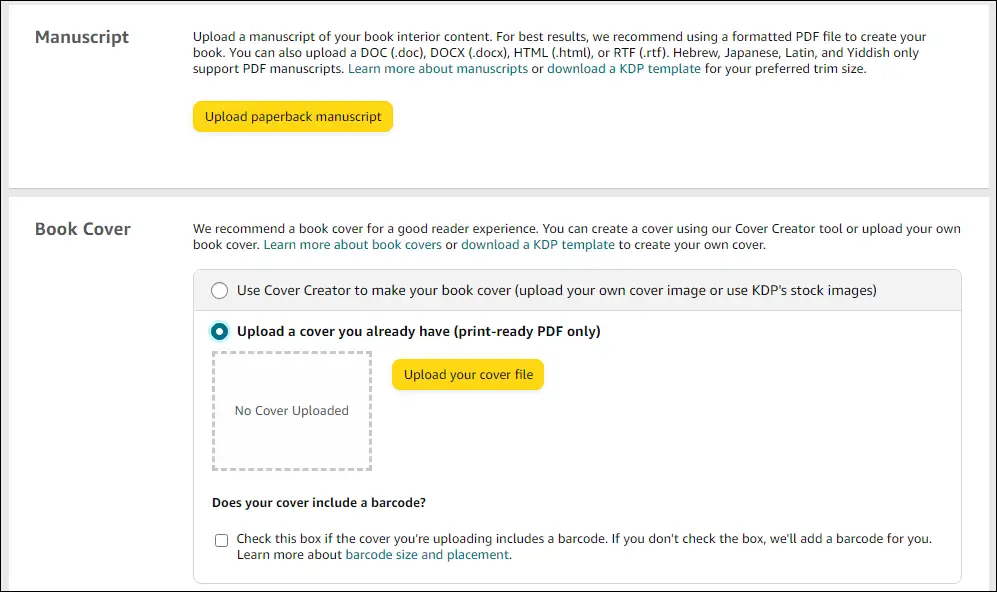
Once you upload your book interior and cover file, kdp will take some time to process & review your files. Once your files are fully processed, you click on the Book Preview button and preview your book to make sure everything is alright.

KDP Book Previewer
Once you click on the launch previewer button, kdp will let you review your book and cover and also let you know if there is an error with one of your files. If your book interior and cover have no errors then you can click on the orange Approve button to approve your book for publishing.
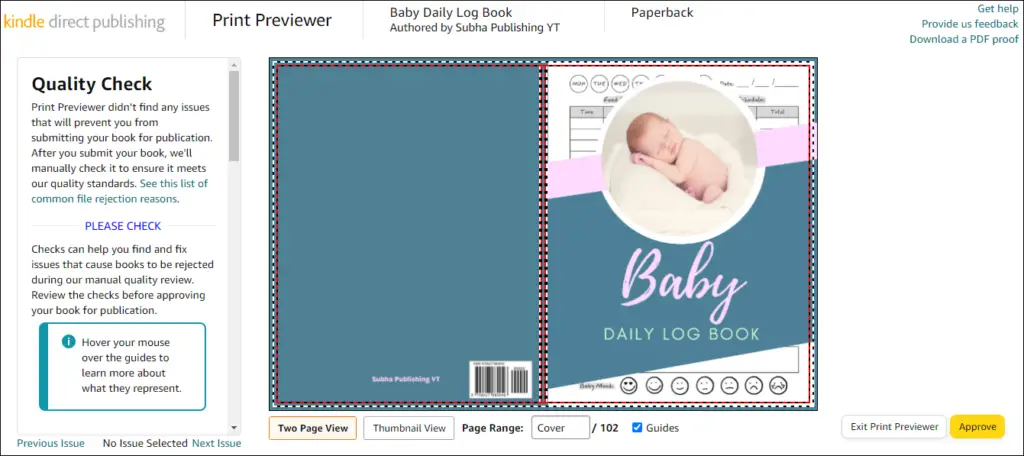
Once you approve your book, kdp will take you back to the book content page where you can check various things like printing costs on various marketplaces. Once satisfied with your book content, you can click on Save and Continue button.
Step # 3 – KDP Paperback Rights & Pricing
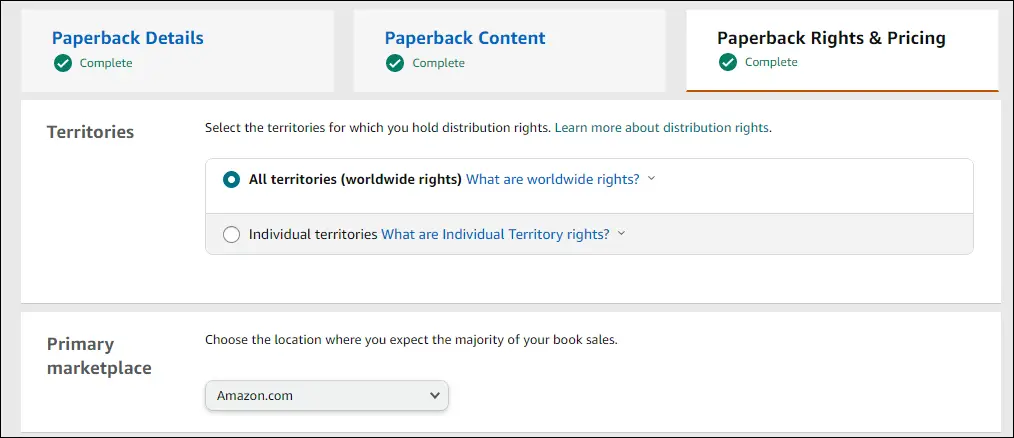
On this 3rd and final page, you can select things like Territories, Primary Marketplace, Pricing & Distribution.
First, you can select territories, preferable you should check all territories for maximum distribution of your book. Next, select your primary marketplace, I always choose amazon.com (Amazon USA) as my primary marketplace.
Pricing, Royalty, and Distribution
Here you can enter the list price you’d like to sell your book for. Once you enter the list price, kdp shows you the printing cost, rate, and royalty amount you will earn per sale.
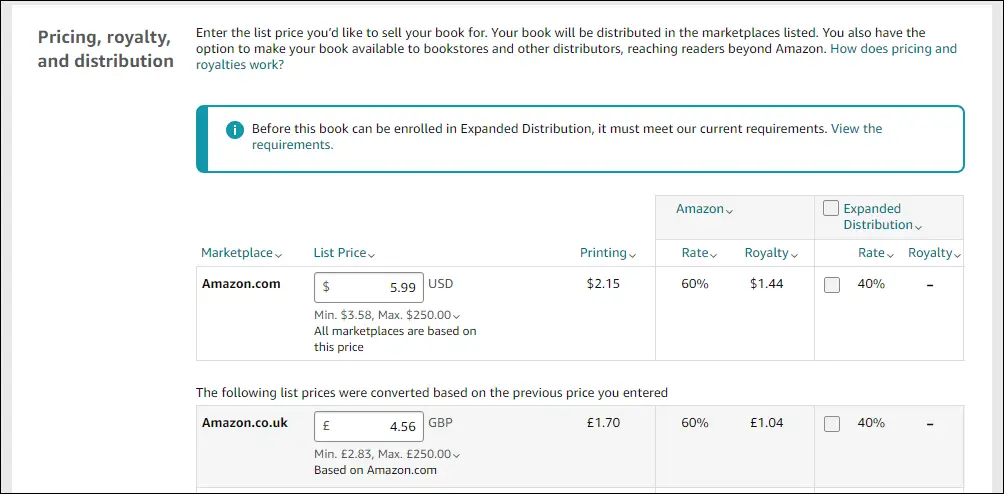
One thing more, kdp auto-calculates the listing price for all other marketplaces, so you need to manually update if you want to make any change. Especially, the newly added marketplaces may not have the correct price and you will be earning zero royalties. So, double-check the pricing on all marketplaces.
Once, done with pricing you can click on Publish Your Paperback Book, by doing so your kdp book will be submitted for review which may take a couple of days. I have noticed some books get approved fast and others may take more than 72 hours.

Alright, you are all done and have submitted your very first book for review!
How long does it take Amazon KDP to approve a book?
Once you submit your book on kdp, it goes through a review process where a member from the kdp team manually reviews your book interior, book cover, and book metadata to make sure it adheres to the kdp guidelines and terms of service.
Most of my books get reviewed within 24-48 hours, however, some books may take up to 7 days. What I have noticed is, books that are targeted towards kids get approved very quickly as compared to other books.
On average, kdp takes 3 days to review and approve your paperback books, until then, your book’s status keeps showing “In Review”. Once approved, your book becomes available for purchase on Amazon.
On the other hand, if kdp sees any problem with your book cover, interior or book metadata, it sends you an email letting you know the issue(s) and ways to fix those issues. In such as case you will need to make necessary changes and resubmit your book for review.
My Verdict!
In this blog post, I have shared what kdp is, how it works, what you can sell on kdp, and finally how to publish your very first low content book on it.
In summary, kindle direct publishing is a wonderful platform by Amazon that has revolutionized the self-publishing space. Using kdp, anyone from anywhere in the world can self-publish an ebook, paperback book, and hardcover book using an internet connection and a computer or laptop.
Thank you so much for visiting my blog and reading this post till the very end!! If you have found this post useful then do share this with your family and friends. Just click on one of the social buttons on this page!
What Next?
❤ Subscribe To My YouTube Channel To Learn More About Low Content Books:
https://www.youtube.com/channel/UCHTJzdE7bzvL8cU0ES6X7mw?sub_confirmation=1
❤ Check out my resource page for tools and resources I personally use to scale my Low Content Publishing Business.
❤ Share this post on your favorite social media site. Thanks!
Subha Malik
