How to Create a Journal to Sell On Amazon in 60 Minutes
Last updated on April 9th, 2024 at 06:29 am
I created a journal to sell on amazon kdp in under one hour. Yes, that’s right, I created both the journal interior and cover and then uploaded it on Amazon in under 60 minutes.
If I break this process into two parts, I created the journal interior and cover in almost 15 minutes and spent the rest 30 minutes on the upload process. Uploading a journal on kdp includes;
- Writing the book title, and subtitle
- Writing the book description
- Setting up the kdp categories
- Searching & adding the 7 backend keywords
- Uploading the book interior and book cover
- Reviewing the digital version of the book
- Setting up the pricing
- Hitting the Publish button
Previously, this whole process took more time as there wasn’t any single platform where you can create both the journal cover and interior at the same time without messing up with the kdp interior and cover dimensions.
Luckily, with Book Bolt Studio, creating both lwo content and medium content books has become so much quick and easier. It not only gives you access to a wide range of pre-made kdp interiors but gives you the ability to create book covers with ease without the need to calculate the cover dimensions.
Actually, if you have book bolt pro then you don’t need any other kdp software both for researching and creating low-content and medium-content books. I personally found it so much useful for both beginners and advanced kdp publishers.
Anyways, let’s start creating a simple lined journal and cover inside the book bolt and then I will show you the step-by-step process of uploading the same journal on amazon kdp.
👉 Book Bolt: https://bit.ly/Book_Bolt (20% Off Coupon Code: subha20)
affiliate disclosure: This post contains affiliate links and I will be compensated if you make a purchase via my links at no extra cost to you!
Create A Journal To Sell On Amazon KDP
🎁 Download 15 FREE KDP Interior Templates
Save time and create beautiful low-content books faster with these 15 ready-to-use KDP interiors — completely free! Perfect for journals, planners, and activity books.
As I mentioned before, creating and selling a journal on Amazon is a 2 step process, therefore, I am going to show you in two steps. But before moving to those steps you need to have the fundamentals right.
What I mean by that is having a clear idea of what are going to create and who is your targetted audience. Like I came up with the idea of creating a Quran Study Journal for Muslims for both men and when who are learning Quran.
Once I had my audience and journal idea in place I just went to the book bolt keywords finder tool and found some relevant keywords. You can do the same for your own journal by using any other keyword research tool as well, however, I like to use book bolt as it is quick and easy to use.
Finding Keywords for Your KDP Journal
Before moving forward, let’s about keyword research. To rank in Amazon search results and make sales you need to find and use one or more keywords in your journal title and subtitle. Also, you need keywords for the 7 backend slots.
I used book bolt to find keywords for my journal. If you have Book Bolt Pro then you can go to the keyword tool under the research section as shown below.
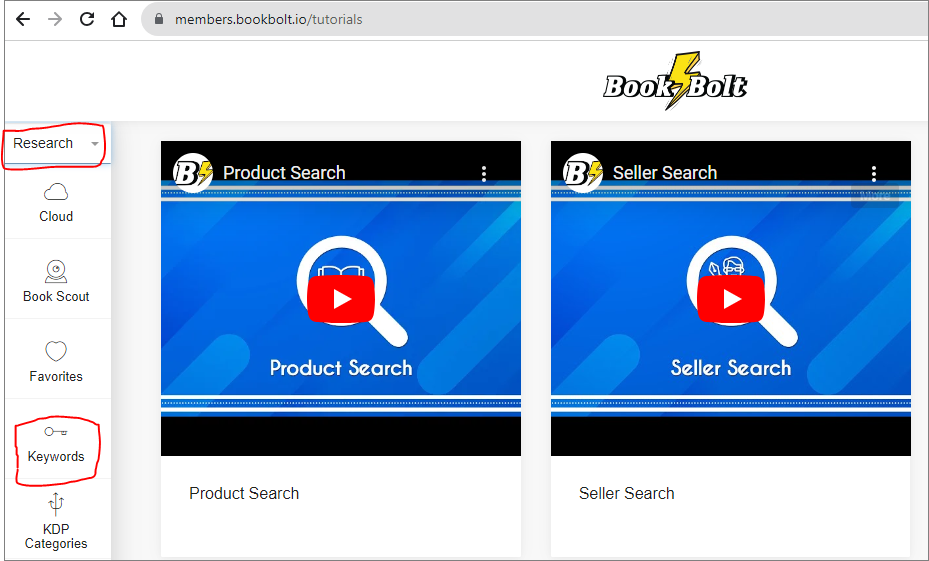
Once you click on the keywords tab it shows two options i.e. search and favorites, here you need to click on the search button and it will take you to the book bolt’s keywords finder tool. In the search bar, you can type any seed keyword/phare and hit the search button.
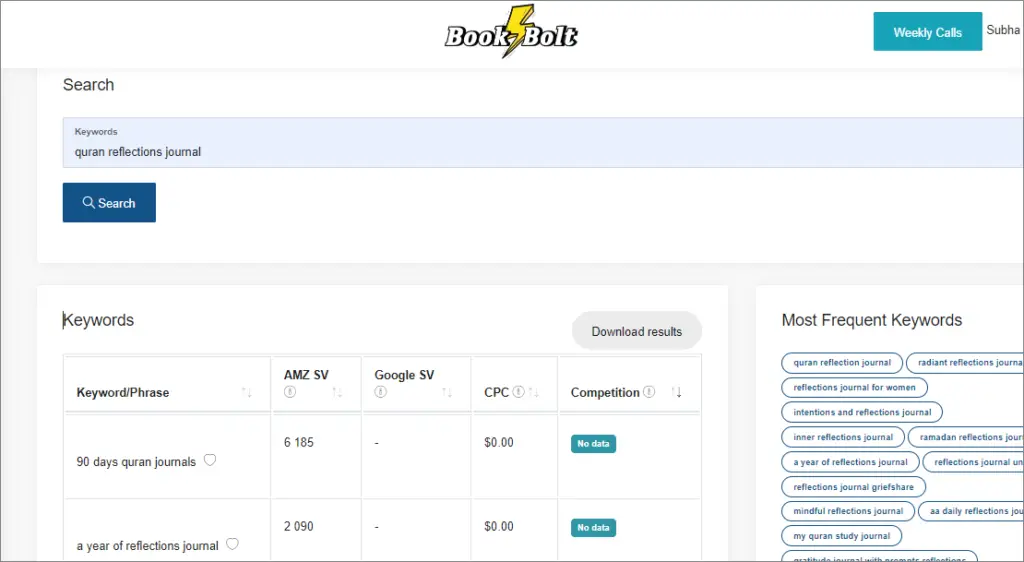
As you can see in my case I typed “quran reflections journal” in the search bar and clicked search. By doing so, the keywords finder tool gave me a lot of keywords along with really helpful metrics like Amazon Search Volume (AMZ SV), Google Search Volume(Google SV), Cost Per Click (CPC), and Competition.
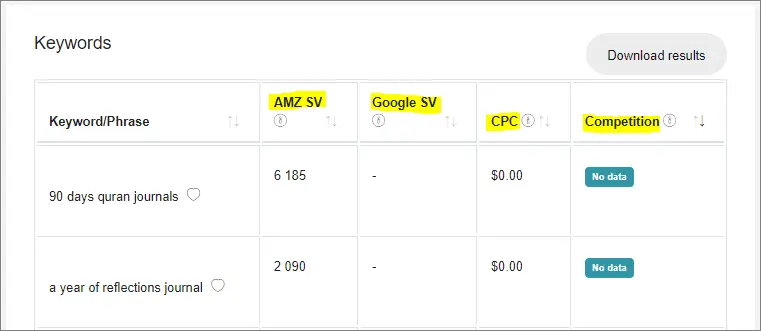
I just clicked on the Competition filter to sort the keywords from low to high competition. I did this as I wanted to find keywords with low to medium competition only. After that just kept scrolling and found the following keywords.
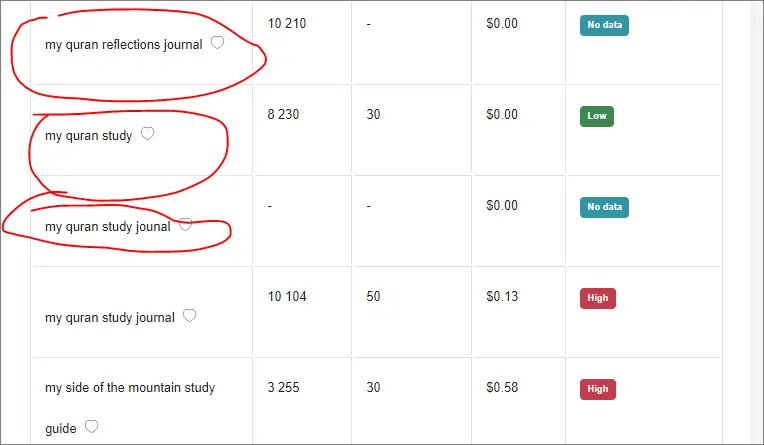
This is how I did my keyword research and ended up using “My Quran Study Journal” as the title of my kdp journal. You can do the same steps for your own journal, this is very easy and shouldn’t take you more than 10 minutes.
👉 Want to create word search puzzle books fast for Amazon KDP? I have written a whole blog post reviewing the instant puzzle generator you can read it here.
Step # 1 – Creating Journal Interior & Cover
I created both the journal interior and cover using book bolt studio. Below I will walk you through the step-by-step process so that you can create the same in a matter of minutes.
To get started, you can visit bookbolt.io and select the Create option. This will take you to the book bolt studio where you need to click on the projects tab as shown below. Then click on the New Project link, and a new popup window will open where you can type the project name, trim size, interior paper type, bleed settings, and page count.
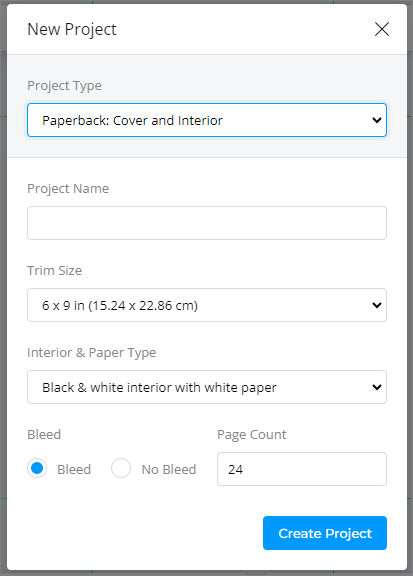
For my lined journal I have selected the Project Type as Paperback: Cover and Interior. I named the project “Blank Lined Journal Wide Ruled” and selected the trim size 6×9 Inches. When it comes to interior and paper type, I selected Black & White Interior with White Paper. My page count is 120 with Bleed.
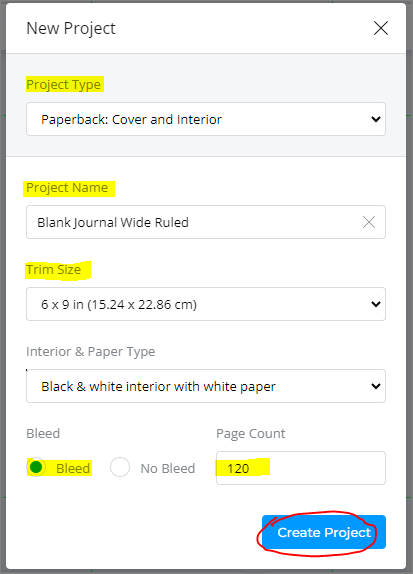
Once satisfied with these project settings, I just clicked on the Create Project Button. This took me to a new page where I created the book and the interior in minutes.
✨ Want to create a coloring book in Canva? I have also written a blog post on How to Use Canva for Kdp Low Content Books, in which I have shown a step-by-step process to create a simple coloring book for free!
Creating a Journal Cover in Book Bolt Studio
To create a book journal cover, I first added a background image using the file library option from the left menu. You can do the same, just click on the file library button just below the Text Tool.
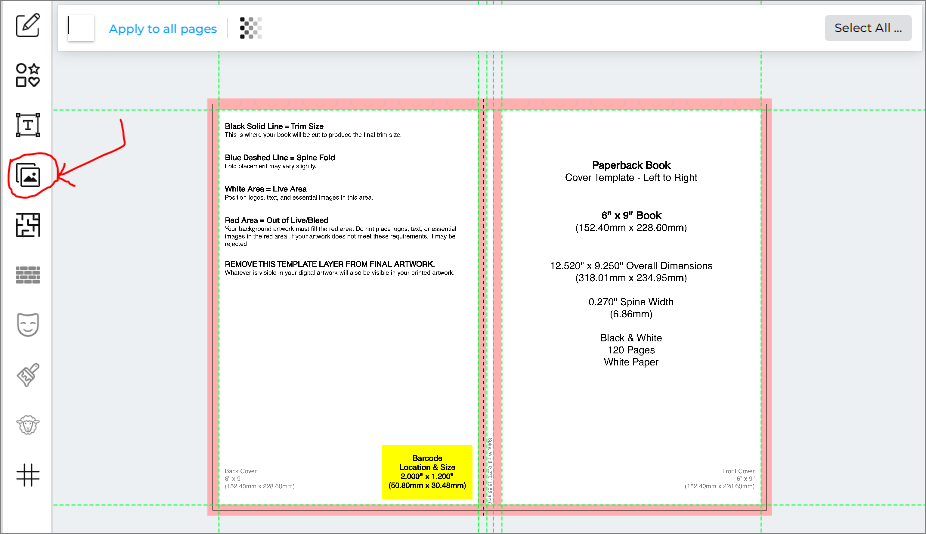
File library gives you three options to add images i.e. upload your own image, get images from Pixabay, and Unsplash.
I just went with the Unsplash tab and searched “Islamic” because I wanted to create a Quran Study Journal. Unplash gave me a handful of Islamic images and I picked the below image to set as my cover background.
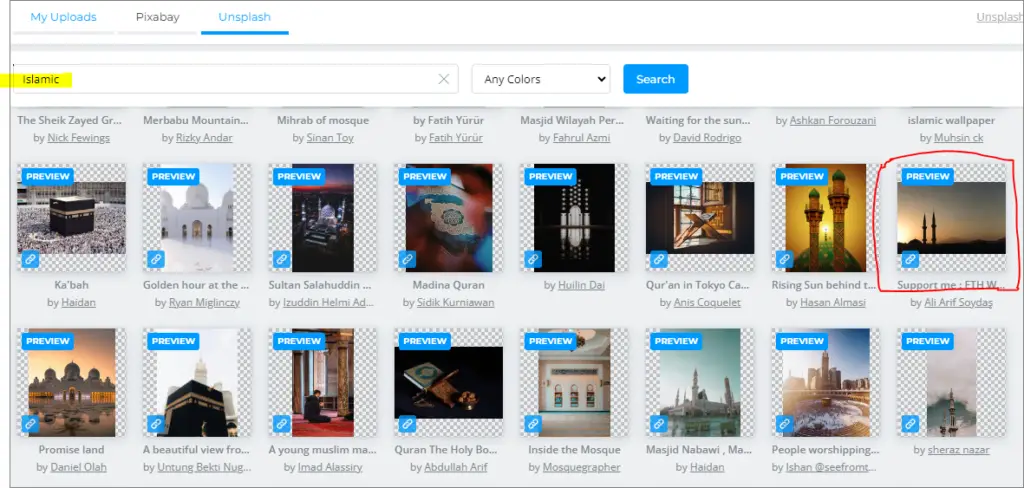
Then I enlarged the image so that it spreads over both the front and the back cover. Then I started customizing the front cover by adding text and shapes from the left-hand side. You can add the text by clicking on the Text tab from the left side menu.
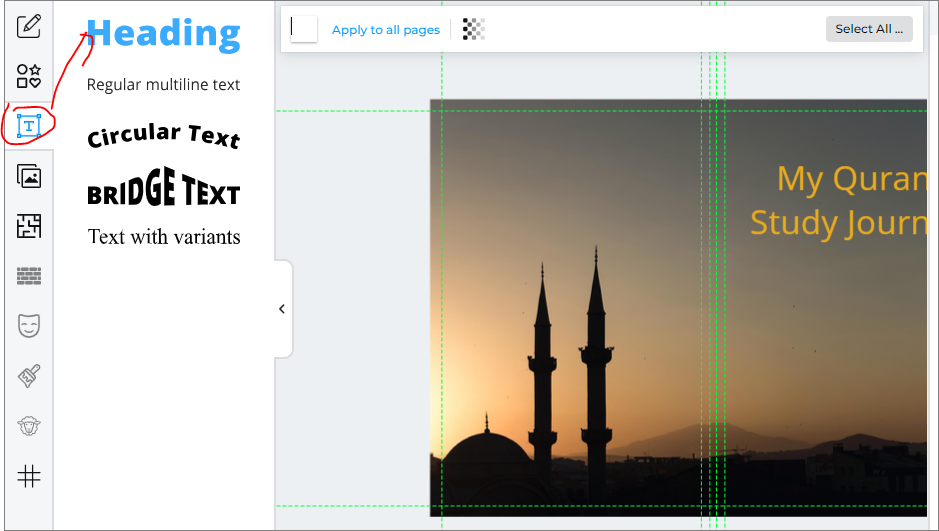
I have added my journal title as “My Quran Study Journal” set the font as Poppins Regular and changed the text color to orange as I have a dark background image. Then I went to the Elements tab just above the Text tab and added a Rectangle shape.
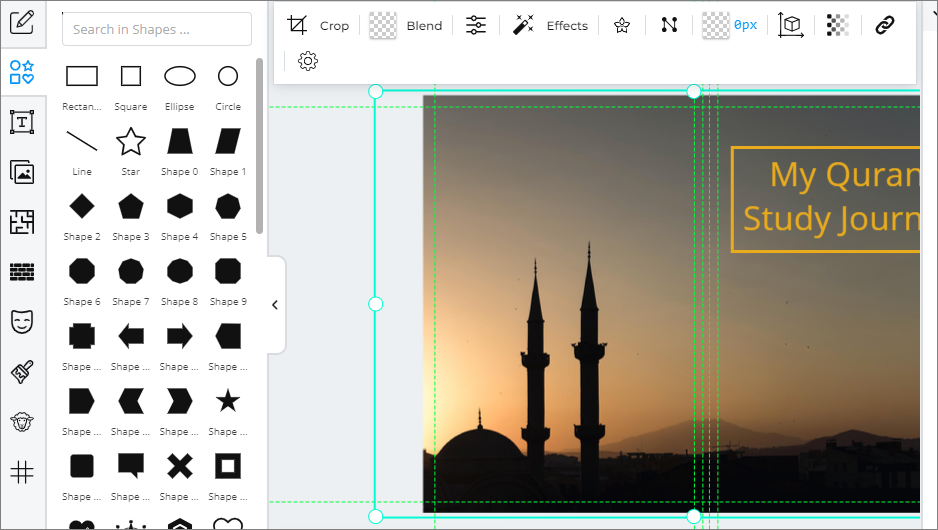
I change the rectangle fill to no-fill and the border color to orange to match the journal title color. The thickness of the border is around 20px. You can do the same if you want to add any element to your front cover.
Next, I added an image for Quran by going to the file library and searching the keyword Quran from the Unsplash tab. Then I cropped the image to fit on the front cover, have a look at the front cover now.
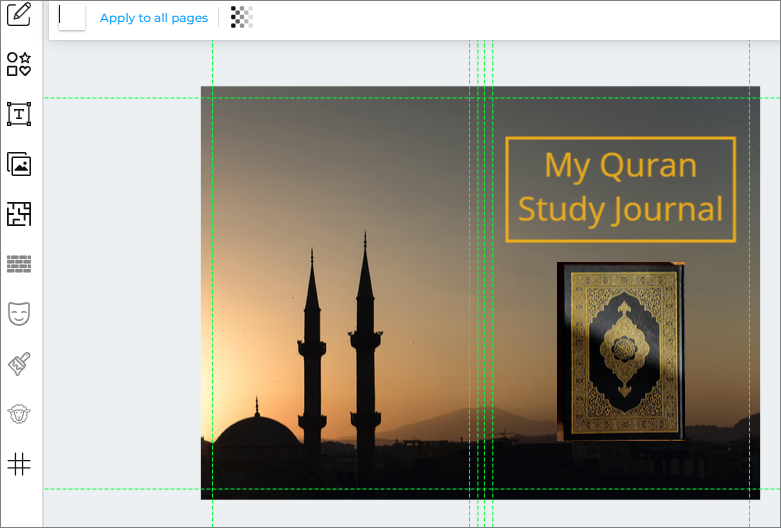
That’s it my journal cover is now done, next, I will show you how I created the journal interior pages using book bolt studio.
Creating KDP Journal Interior in Book Bolt Studio
To create kdp interior manuscript, I first clicked on the very first blank interior page from the very left-hand side. Then I clicked on the Page Templates, you refer to the screenshot below.
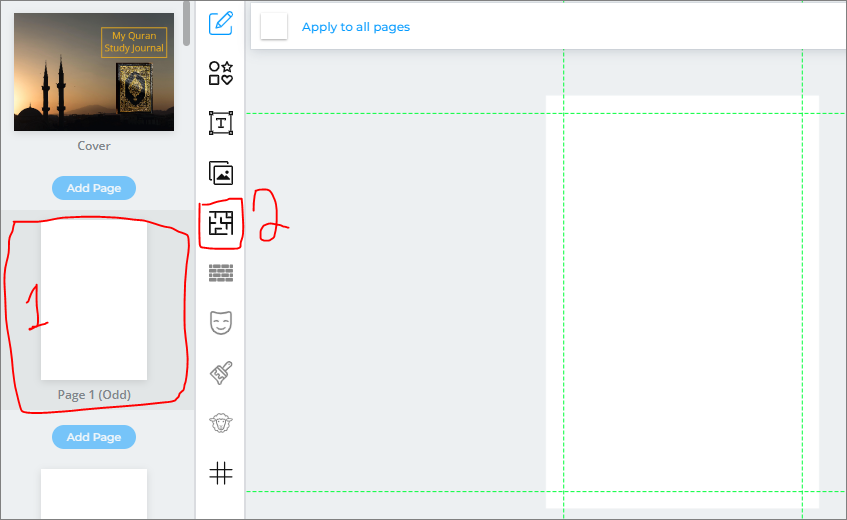
When you click on the “Page Templates” tab a new window opens where you type a keyword or phrase in the search bar. You can type “journal” if you want to create a lined journal.
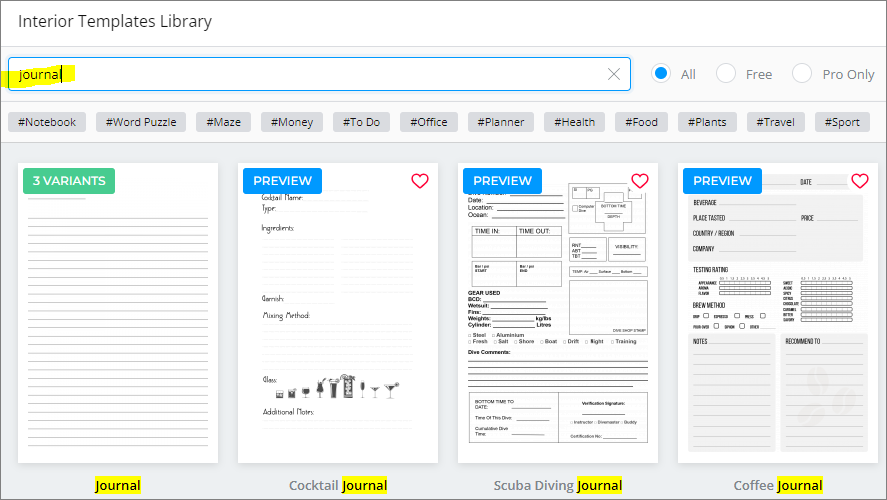
I did the same and then clicked on the very first template that literally says “Journal”. It comes with three variants, and I ended up using the Wide Journal which is basically a wide-ruled lined journal.
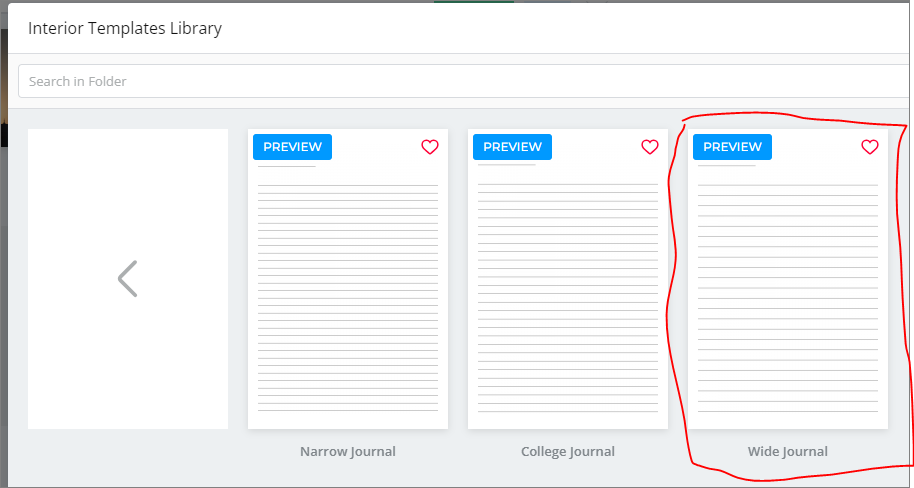
When I clicked on the Wide Journal template, book bolt showed the next page where I could choose the page on which I want to use this wide journal template. I just clicked on select all first and then deselected the cover page and the very first page as I wanted it to be a blank page.
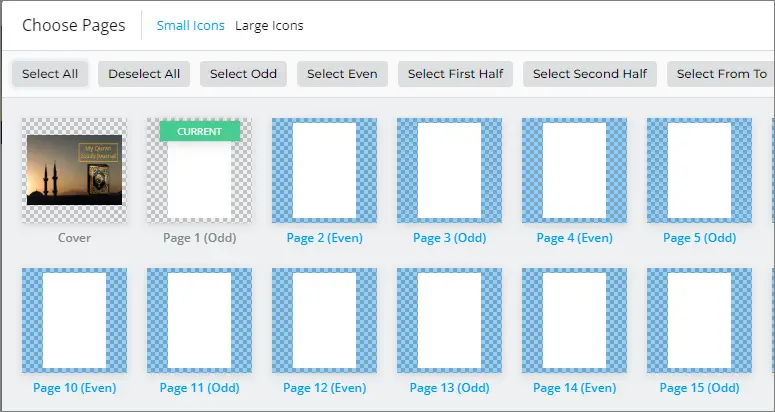
Next, I clicked on the next button and it took me to the options page where I just left everything unchanged. You can do the same or change the things like margins, line-to-line distance, line color, line thickness and bleed.
Then I just clicked on the submit button, and it started the interior page for my kdp lined journal. After a few moments, my journal interior was ready. But I just wanted to customize the first page I left blank on purpose.
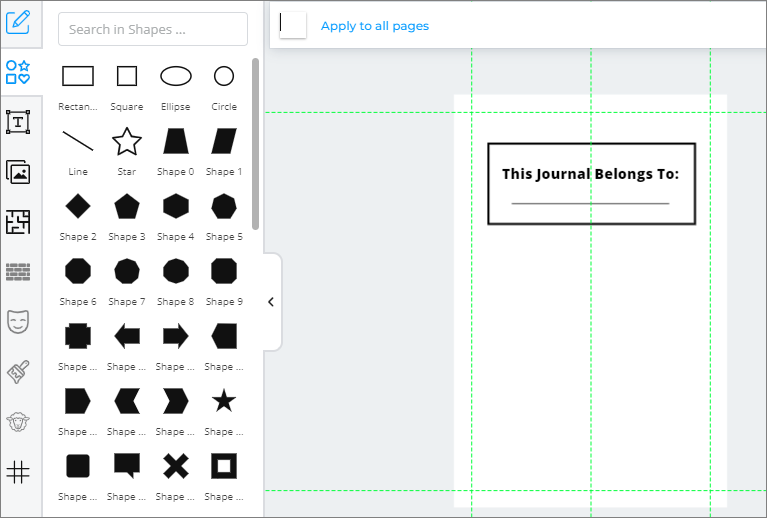
As you can see in the screenshot above, I created a very simple “This Journal Belongs To” using the Text and Elements sections. I just added and line and a rectangle and then added text. You can do something similar to create this very first page for your lined journal.
That’s it, my kdp journal interior and cover were done now, I just needed to download them onto my laptop.
👉 You may like to check out my blog post about the Powerpoint Puzzle Generator, that an extremely helpful tool for creating puzzles within Powerpoint within minutes!
Downloading Journal Interior And Cover From Book Bolt Studio
You can download your journal interiors and cover by going to the Download button from the top menu. Here you can click on the very first option that says “Download Current Project CMYK (Printed Books)”.
I did the same and book bolt started processing the project and then downloaded it as a .zip folder that I extracted to a folder. This folder contained ready-to-pdf interior and cover files. This completed my first step.
👉 Book Bolt: https://bit.ly/Book_Bolt (20% Off Coupon Code: subha20)
Step # 2 – Uploading Journal on Amazon Kdp
Once I had my journal interior and cover created, I quickly moved to the step that was uploading the journal on Amazon. May know already know that Amazon has a separate dedicated platform for publishing books aka KDP (Kindle Direction Publishing).
Creating New Title on Amazon KDP
If you are new to amazon kdp then you can create a free account by visiting kdp.amazon.com and start uploading your very first journal. As I already had my kdp account, I just clicked on the Create button from my kdp dashboard.
Going forward, I will show you how you can do the same. Before uploading your notebook or journal on kdp, I highly recommend reading kdp’s content guidelines here.

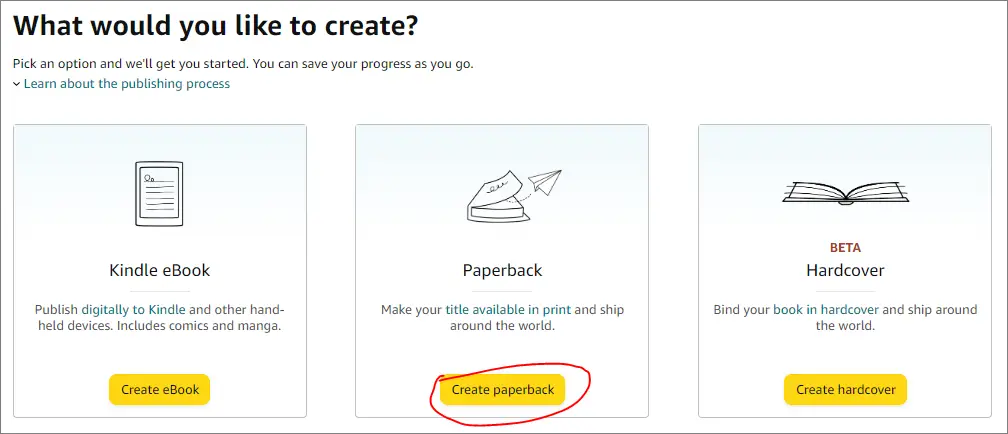
On the next page, you can click on Create Paperback as low-content books including journals are meant to be published as paperback or hardcover books only.
Journal Title, Subtitle & Author Information
Next on the paperback details page, I just typed my journal’s title & subtitle. You can see I have used another keyword in the journal subtitle in a natural way so that it doesn’t look spammy.
You can do the same but don’t add any keyword just for the sake of adding it, only add a keyword if it makes sense.

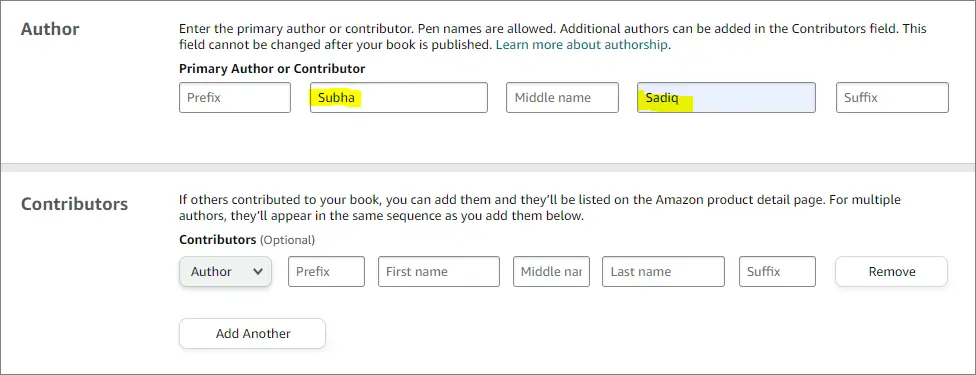
Next, I entered my author’s name and left the contributors’ information blank as in my case there was any contributor to my journal. You can use your own name as the author’s name or use a pen name but don’t use any keyword phrase or copyrighted keyword for this purpose.
Journal Description (KDP Book Description)
Kdp book description is basically a brief summary of your book or journal. This serves as your product description on Amazon so that potential buyers can know more about your journal.
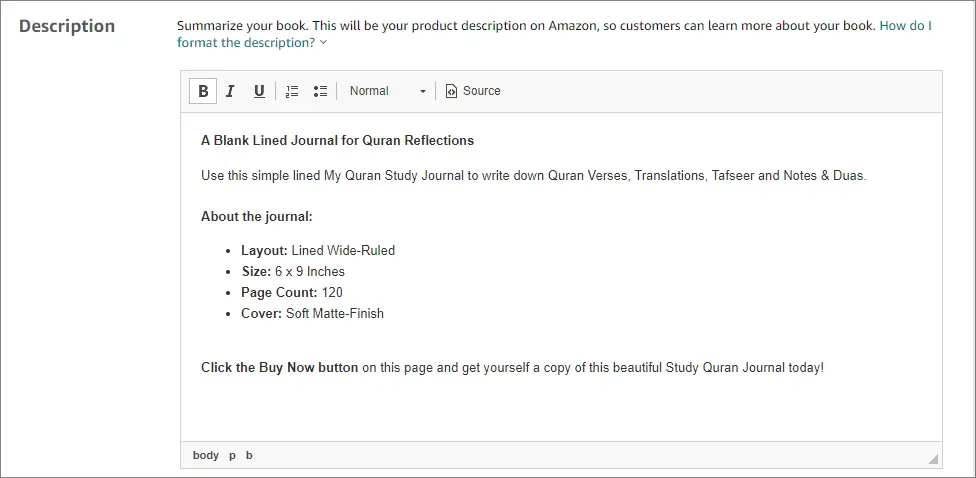
As you can see I have added a bolt headline and then a sentence to engage the buyers. I added the About the Journal section where I added some necessary details like journal dimensions, layout, No of pages, and cover finish.
Finally, I added a call to action to encourage the buyer to buy the journal. You can too write your journal description in a similar format.
Kdp Categories for Journal
Kdp has recently made some changes to the way you add your book to different categories. Now you can add your journal to up to three very relevant categories. As you can add your journal to more categories, it doesn’t mean adding it to totally irrelevant ones.
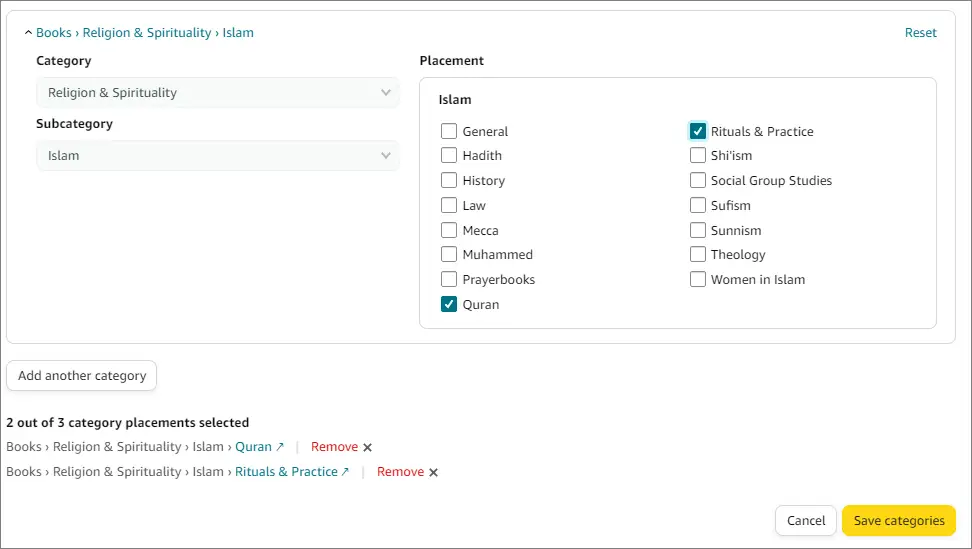
I added my journal to one main category and selected two sub-categories. You can add yours to totally different main categories as long as they are relevant to the type of journal you are selling.
If you want to learn more about KDP categories, I have written a detailed post on How to Choose Categories for Your Kdp Books! Check this out!
KDP Book Classification
Just below the kdp categories section, you need to mark your journal as a Low-content book as journals, notebooks, and planners fall under the umbrella of low-content books.
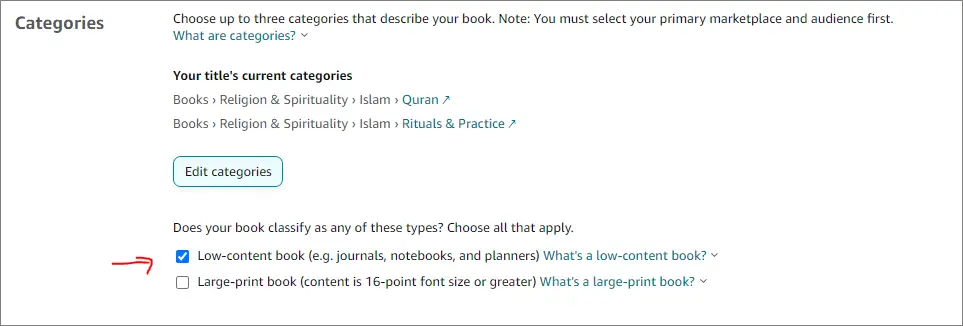
If you don’t know what low-content books are, these are basically blank books with no or low content inside. Most of the time, one page is repeated 100 or more times to create a low-content book so there is no unique content.
Kdp Backend Keywords
Next comes, the famous 7 kdp backend keywords section. Most kdp publishers overthink it and try to add as many keywords as many they can. However, the fact is these keywords do help in the searchability of your book on Amazon but carry less weight than the book title and the subtle.
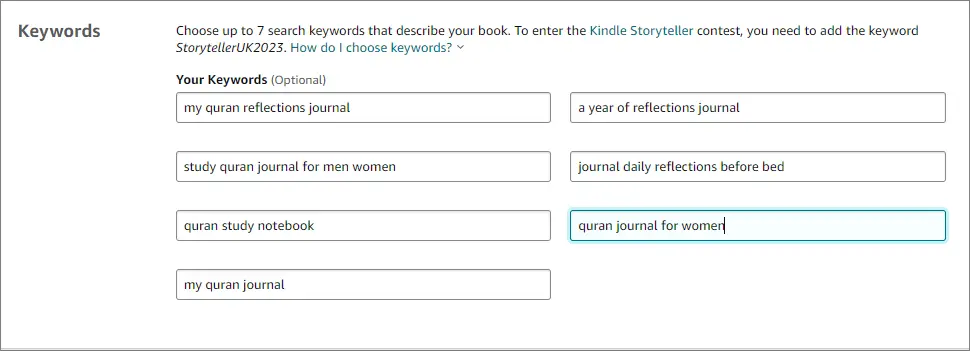
As you can see, I added a mix of both long-tale and short-tale keywords to fill these 7 kdp keyword slots. I found these keywords during my keyword research process using book bolt.
There are certain best practices to follow while adding kdp keywords. Also, you must avoid certain keywords and phrases, you can read more details straight from kdp here.
KDP ISBN
Once you have finished setting up the Paperback Details, you can continue to the next step which is Paperback Content. The very first thing on the second page is the ISBN settings.
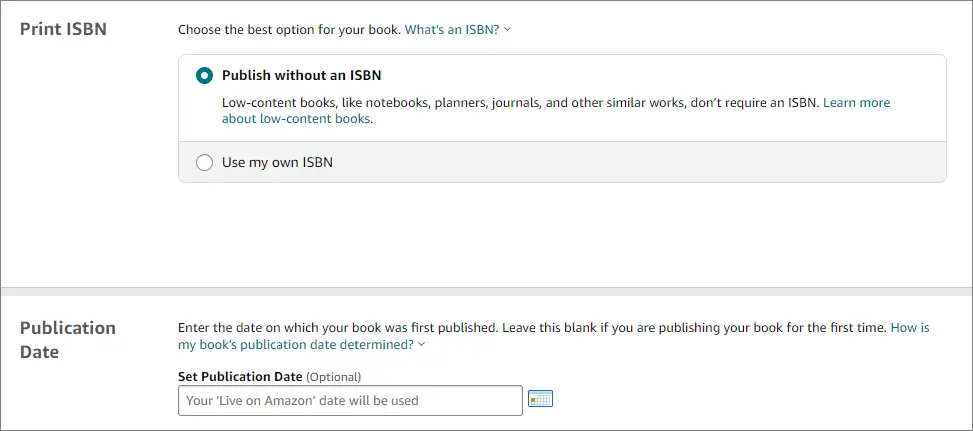
As I was publishing a low-content book, therefore, I selected Publish without an ISBN. Remember on the previous page, I marked my journal as a low-content book, that’s why kdp is showing me this option. Otherwise, kdp assigns a free ISBN for medium-content and high-content books.
Next, you can add a publishing date or leave it blank if you are publishing it for the first time in such a case the book submission date would be your book publishing date. I left it blank as well.
KDP Print Options
Next comes print options for your kdp journal. I selected the default option which is a Black & white interior with white paper.
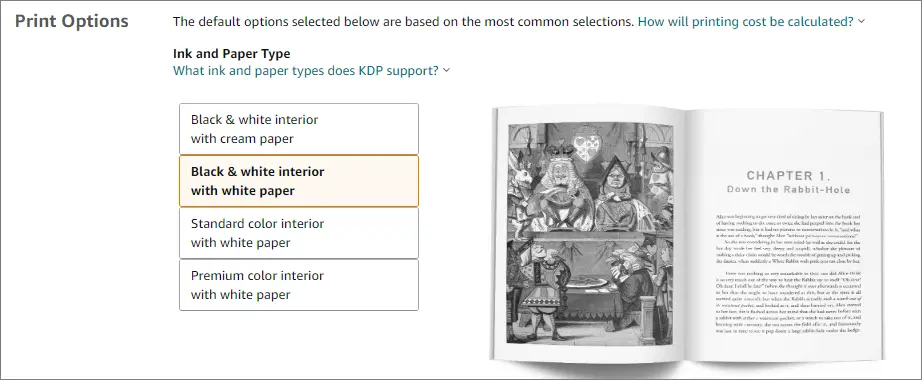
Remember this is the same setting as you selected while creating your journal interior and cover using book bolt studio.
KDP Journal Trim Size
Under trim size settings, you can select book dimensions, bleed settings, and paperback cover finish. You can learn more about these settings by clicking on the blue link under each setting.
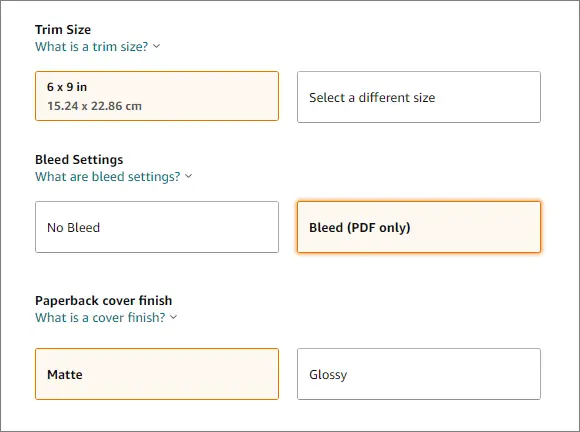
In my case selected the trim size as 6×9 inches with bleed and the cover finish as matte. Again these are the same settings that I used to create my journal inside book bolt.
KDP Journal Manucript & Cover
Here you can upload your journal interior and cover files. These are files you downloaded from book bolt.
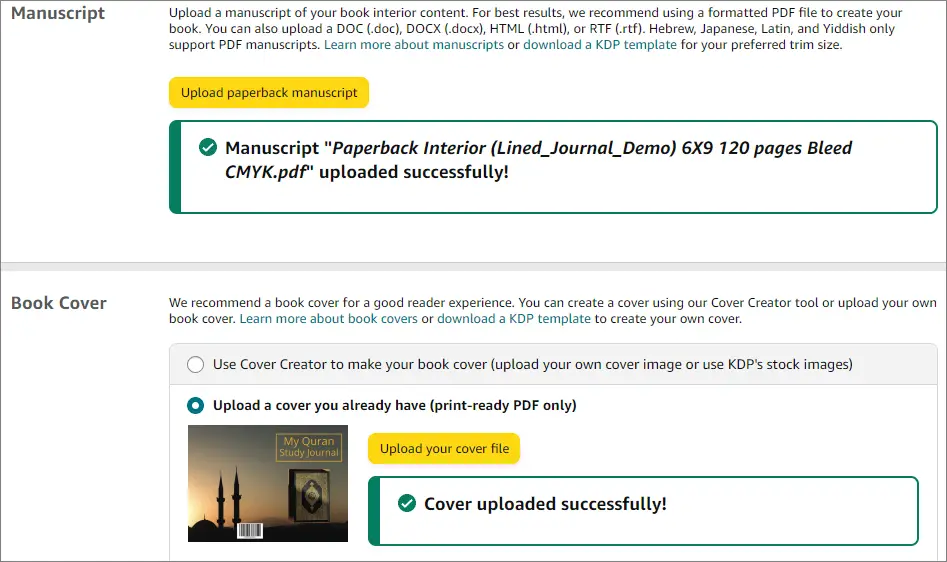
Once the upload is processed, you will be able to preview the digital version of your kdp journal. Sometimes, kdp takes a bit longer to process your files before you actually can preview them.
KDP Book Preview
In my case, it took hardly 5 minutes before I was able to Launch Previewer. You need to preview your journal to check it for formatting and print quality issues.

Just click on the Launch Previewer and it will take you to the next window where you can see both your book cover and interior like a flip book.
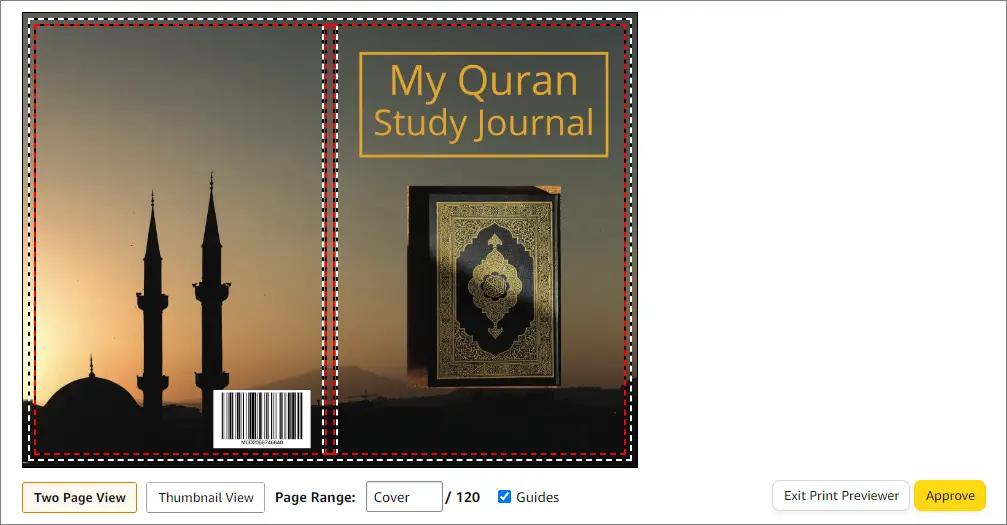
Here you can see your book cover and interior page by page. KDP also checks both files and lets you know if there is any problem with these.
In my case, there wasn’t any error with both files so I simply clicked on the approve button and moved on to the next step.
Once you approve your book on kdp, the content page reloads and shows you a summary of your book along with printing costs in various marketplaces.
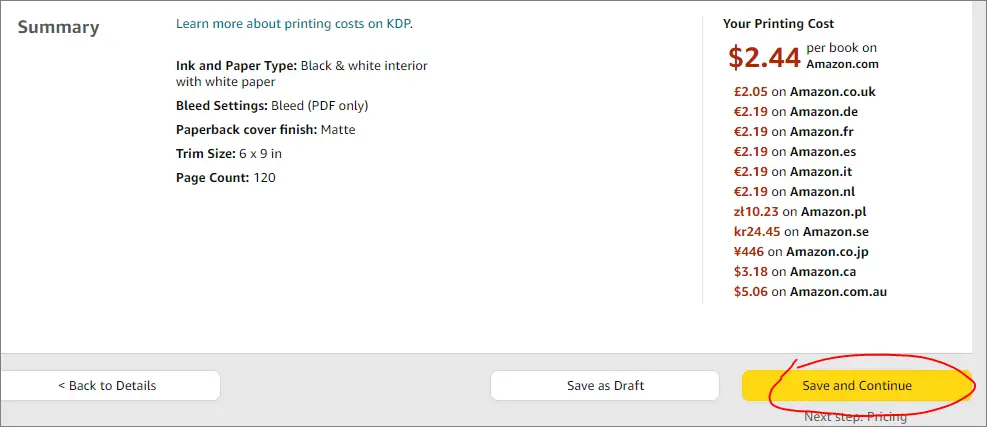
Next, you can click on the save continue button to move on to the next and final step which is Paperback Rights & Pricing. On this page, you can select the territories in which you have the distribution rights.
In my case, I selected All territories (worldwide rights) and for the primary marketplace, I went with the default option which is amazon.com.
Pricing Your KDP Journal
Next, you can price your journal for selling on various marketplaces. Kdp shows you the minimum pricing under each marketplace along with the printing cost and royalty information.
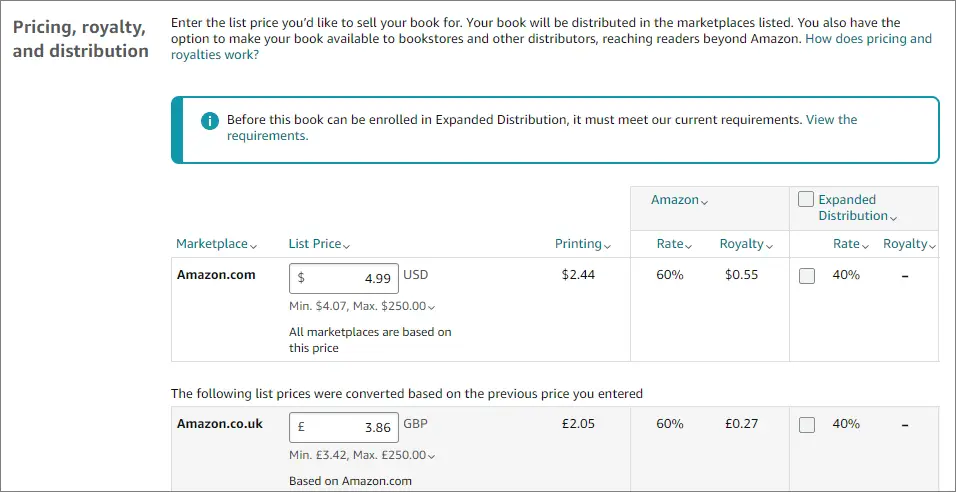
In my case, kdp showed the minimum price as $4.07 and I priced my journal at $4.99. At this price, I will be earning $0.55 per sale.
Pro Tip: Initially, you can set a lower price to get, and once your journal has some positive reviews you can raise the price by a dollar or two.
Publish Your Paperback
Once you double checked everything, you can click on Publish Your Paperback Book. This will submit your journal for review which can take from a few hours to a few days. In my case, it took less than 24 hours before my journal was live on Amazon.

Congratulations! You successfully published your very first journal on Amazon and you are now an author and publisher.
👉 Book Bolt: https://bit.ly/Book_Bolt (20% Off Coupon Code: subha20)
Let’s Summarize It
Creating and selling journals on Amazon can be a really good passive income idea and everyone can do this by using a laptop and internet connection from anywhere in the world.
Bookbolt has made it even easier to create both low-content books and medium-content books that you can sell on Amazon and earn passive income online.
However, your success on Amazon really boils down to your ability to find better book ideas and create a worth-buying book.
If you want to learn about this kdp publishing business you can check out Self Publishing Titan’s KDP Masterclass. This is not absolutely necessary, however, investing in a course or mentorship can really make things faster and can potentially save you a lot of time.
This is all from me today. I sincerely hope you’ve found this blog post useful, if so then do share it with your friends.
Thanks for sharing it!
Subha
Want to Publish Your First Amazon KDP Book the Right Way?
I created a beginner-friendly Amazon KDP course that walks you through niche research, book creation, and publishing — step by step.
👉 Access the Amazon KDP MasterclassPerfect for beginners starting with low- and medium-content books.

