How Do I Make Low Content Books? My 3 Step Process
Last updated on March 25th, 2024 at 04:02 am
🎁 Download 15 FREE KDP Interior Templates
Save time and create beautiful low-content books faster with these 15 ready-to-use KDP interiors — completely free! Perfect for journals, planners, and activity books.
Welcome here, in this blog post I will be sharing you how do I make my low content books!
Making a low-content book is basically a three-step process that I follow for almost all my low and content books. The steps involved are really simple and repeatable! So, what are these steps? Well, nothing complicated, the process flow for low content book creation involve;
- Research
- Create
- Publish
That’s how simple this process is. My process of creating a low content book always starts with the Research stage and once done with that I decide on the software to use for creating book interiors.
Below I will discuss in detail the above-mentioned steps one by one!
So, stick around.
Related posts;
How Do I Make Low Content Books – Step By Step
As mentioned earlier, Let’s dive in and discuss each step in detail for creating a low content book interior!
Step # 1 – Researching Low Content Books
When it comes to researching, there are two types of research for low content books i.e Niche Research and Keyword Research. Picking up the main topic or idea for your book is called niche research and You can find niches for your low content books very quickly and easily. What we call “Niche” essentially is something related to the group of people having a common interest, profession, problem, or hobby.
Just think of your potential buyers in terms of who they are, what they do, what relationships they have, what problems they face, and what hobbies they are involved in. So, based on this basic info about your buyers, you can easily find niches.
You may like this video about finding a niche for your low and no content books.
For instance, if we talk about professions, the most popular or most common are niches including Doctors, Engineers, Nurses, Teachers, Gardeners, and so on. In this way, you can find so many niches.
And people have kids too, so you can think of the books people may be interested in buying for their kids to keep them busy or help them learn something!
For instance, you can create a handwriting practice paper for preschoolers or kindergarten kids. In this example “Handwriting Practice” is a niche for your low content book.
Once you are done with your niche selection, you need to find keywords to include in to book title, subtitle, and back-end keywords boxes. I have recently created a very detailed video on that as well, have a look at it!
Step # 2 – Creating Book Interiors
In this step, I usually think of the interior type, size, and no of pages to include. Mostly, I look at the other similar books listed on Amazon to have an idea of the book interior. Sometimes, I also do a google search and look at the google image results. One word of caution, I don’t copy rather I try to add my own touch to make them unique.
Choosing Trim Size
For the sake of this post, I am taking the example of handwriting practice paper. To create a handwriting practice paper for kids, I will stick with the large interior size that is 8.5 x 11 In. That is because most of the kids’ books fall under this trim size.
Bleed Vs No Bleed Kdp Interiors
Once you’ve selected the trim size, you need to decide, is it with bleed or without bleed. An interior with bleed is necessary for a book where your graphics extend towards the edges of the page. On the other hand, no bleed is applied to the interiors where your interior content remains within the margins and doesn’t extend towards the edge of the page.
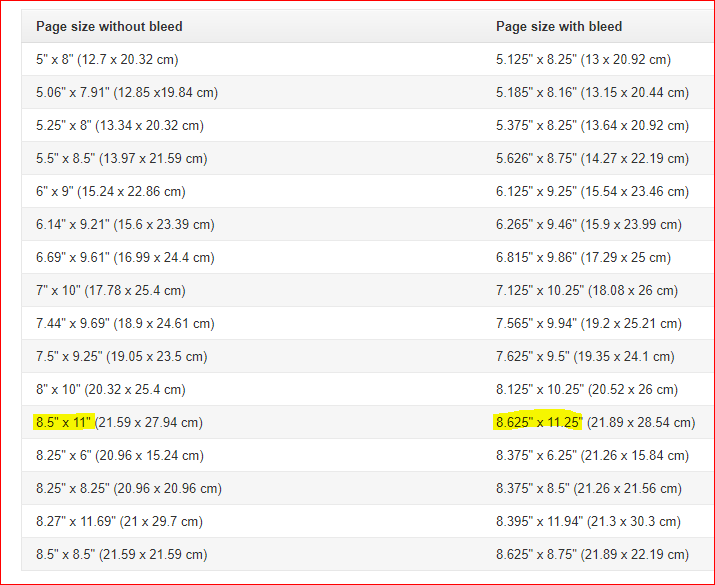
As you can see in the above screenshot, to create an interior with bleed you need to increase the page size. Just add 0.125″ to the width and 0.25″ to the height. For example, our interior with no bleed is 8.5″ x 11″ (15.24 x 22.86 cm), and after adding bleed, It will become 8.625″ x 11.25″ (21.89 x 28.54 cm).
Still not sure, just watch the below video!
You can read more about Paperback Manuscript Templates here – https://kdp.amazon.com/en_US/help/topic/G201834230
Choosing Low Content Book Software
I personally use two softwares most of the time to create my low and no content books,
1). Canva – Free version is all you need
2). PowerPoint – Comes with office 365 annual subscription
And recently I have started using Affinity Designer and I am using their 90 days free trial.
Nevertheless, PowerPoint is the easiest and my favorite software to use for creating my low and no content book interiors. And the reason behind this is, you can easily create book interiors using shapes and tables in it and most importantly you can easily duplicate pages (slides) and then export them as .pdf files.
Sticking with our example of handwriting practice paper, just watch the below video in which I will guide you on how to create it in PowerPoint.
Also, I have a playlist of 30 videos about creating kdp low content books interiors. You can watch them below;
KDP Interiors – https://www.youtube.com/playlist?list=PLDU2KF5drDBJKUKr9hIUowt80GzLnW0kf
Step # 3 – Publishing Low Content Books On KDP
This is the final and most interesting step in kdp low content book publishing. I personally make a separate folder on my hard drive. And within that folder, I make two or three more folders like Interiors Files, Cover Files, and Resource Files.
This helps me organize things a bit. I also create a text file named MetaData with contains Title, Subtitle, Book Description, and Backend Keywords.
Creating Covers for Low Content Books
To create a cover for a low or no content book you need to have a book cover template, and you can download it from kdp itself. Just visit Paperback Cover Templates and enter your interior information including trim size, no of pages, and paper color. Once done, just click on download.
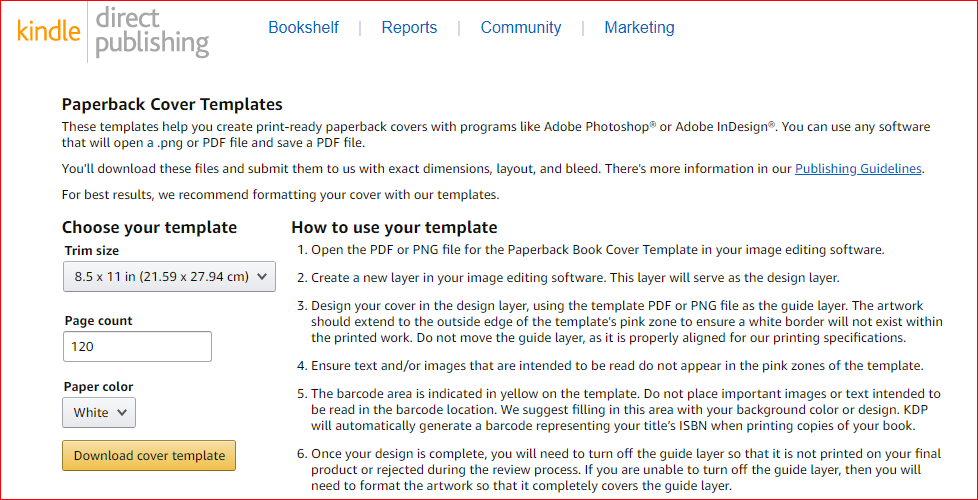
The download folder will have a .pdf and a .png file in it. You will need this .png cover template to create a cover using Canva. I have a video explaining these steps as well, you can watch it below;
Once done with the cover and interior creation, you will need to create metadata for your low content book. For example, for creating a handwriting practice paper book you can create your metadata file as follows:
Book Title – Handwriting Practice Paper For Preschoolers
Subtitle – Large Size 100 Blank Writing Pages for Preschool Kids
Book Description:
Over 100 Blank Writing Pages to Practice Handwriting
This handwriting practice paper notebook comes with dotted lines which makes it easy for ABC kids to trace letters and numbers. They will have fun tracing letters and numbers in this amazing dotted notebook for practicing handwriting!
Book Features:
- Layout: dotted lined paper
- Kids friendly paper size – 8.5×11
- Perfect preschoolers and toddlers
- Perfect for tracing alphabets and numbers
- Good quality white page interior
- Glossy finish cover
For book description, you need to convert it into Html code to have a better appearance on kdp. You can use any Html editor to create Html code for your book description.
I have a video on that too!
Uploading Your Book to Kdp
Now, as we are done with our metadata, we are ready to upload our book on kdp amazon. To better understand this process, watching an over-the-shoulder video can be helpful! So, have a watch of the below video on “How to Upload No or Low Content Books to Amazon KDP”.
That’s all! These are those three steps I mostly follow to create my low and no content books!
Final Thoughts!
In this blog post, I have shared with you my step-by-step process to create low content books. And I hope, that will help you publish your first low content book on amazon kdp. If you found this helpful then do share it with others as well!
What Next?
❤ Subscribe To My YouTube Channel To Learn More About Low Content Books:
https://www.youtube.com/channel/UCHTJzdE7bzvL8cU0ES6X7mw?sub_confirmation=1
❤ Check out my resource page for tools and resources I personally use to scale my Low Content Publishing Business.
❤ Share this post on your favorite social media site. Thanks!
Subha Malik
Want to Publish Your First Amazon KDP Book the Right Way?
I created a beginner-friendly Amazon KDP course that walks you through niche research, book creation, and publishing — step by step.
👉 Access the Amazon KDP MasterclassPerfect for beginners starting with low- and medium-content books.


